


The Contractor's Complete Guide to Framing Takeoff Estimation
Here's the thing about framing takeoff mistakes: the costly ones are rarely the obvious ones. Nobody forgets to count walls. What gets missed is the shear wall designation on sheet 23. Or an engineer's note that changes a beam spec. Small things, until they show up as a material shortage or a blown budget mid-project.
For framing contractors and estimators doing this manually across multiple bids, the process demands more than it appears from the outside.
This guide covers what it actually takes to get it right: the steps, the judgment calls, the common pitfalls, and what modern estimation tools make possible.
So, what exactly is a framing takeoff?
Think of a framing takeoff as your project's shopping list. One that’s very detailed and precise.
A framing takeoff is the process of reviewing a full set of construction drawings to identify every piece of lumber and structural material required for the job. Wall studs, plates, headers, joists, sheathing, roof members, fasteners, connectors — all of it, before a single order is placed or a bid is submitted.
It's the foundation of every wood framing estimate.
Get it right: Your procurement runs clean, your crew has what it needs, and your margin holds. But errors in a framing takeoff travel into ordering, scheduling, and field execution. At this point. fixing it costs far more than catching it would have.
Framing typically accounts for 10–20% of the total construction cost in residential and light commercial projects. Clearly, that's not a line item you can afford to estimate loosely.
Framing takeoff vs. lumber estimate: Understanding the difference
These two terms get used interchangeably all the time. They shouldn't.
A framing takeoff is purely about quantities. You're reading the drawings and counting everything the structure needs. The output is a material list. No pricing, no costs, no dollar figures. Just a precise account of what the job requires.
A lumber estimate is what happens next. It takes that material list and adds the money layer — pricing, waste factors, labor costs, and supplier rates — to give you a number you can actually bid with.
Two estimators can work from the same framing takeoff and arrive at different lumber estimates depending on when they priced it and which suppliers they called.
The takeoff stays constant. The estimate reflects the market.
Why accurate lumber estimates are critical for cost control
Ask any experienced framing contractor or residential builder where margin actually lives, and they'll tell you the same thing: in the details.
Inaccurate quantities don't just throw off the budget; they create a chain reaction across the job:
- Material shortages that force emergency orders at spot pricing
- Over-ordering that ties up cash and creates disposal headaches
- Labor scheduling that doesn't match what's actually available on site
- Change orders that trace back to something that should have been caught at the takeoff stage
The ground reality is that the cost estimator who consistently produces accurate takeoffs isn't just doing good paperwork. They're protecting the profitability of every project before it breaks ground.
How to estimate a framing takeoff: A step-by-step breakdown
Here's what a thorough framing takeoff actually involves.
.avif)
Step 1: Review construction plans and define project scope
Before anything is counted, the estimator reads the entire plan set. Architectural drawings, structural drawings, framing details, and the engineer specs. On a mid-size residential project, that's usually 30 to 50 sheets.
This step is where the whole takeoff gets grounded. The steps include:
- Mapping wall heights across every level
- Identifying load-bearing vs. non-load-bearing walls
- Understanding the roof framing type
- Working through door and window schedules
- Flagging any structural conditions that affect material selection.
Getting the calculations right means every downstream calculation is grounded in an accurate reading of the project.
And done properly, this step alone takes several hours. And it's not one you can rush through and recover from later.
Step 2: Calculate wall stud quantities
Stud calculation starts with a straightforward principle: total wall length divided by stud spacing, but the application is where the detail work begins.
Corners require specific multi-stud assemblies. Wall intersections vary depending on your framing method. Each opening removes studs from one part of the count but introduces king studs, jack studs, and cripple studs that have to be added back.
Meanwhile, wall height variations across the plan mean you're often working with multiple stud lengths simultaneously.
And that’s not all. Exterior walls may require 2x6 framing for energy code compliance, while interior partitions may use 2x4 framing. And all of those need to be tracked as separate line items.
A complex residential footprint can have 15 to 20 distinct wall conditions. Each one requires its own calculation, cross-referenced against the structural drawings. The math isn't complicated; the volume of decisions is what makes this step time-consuming.
Step 3: Estimate header materials for door and window openings
Every opening in every wall needs a header. The size of that header depends on three things:
- The width of the opening
- The load conditions above it
- Whether the wall is load-bearing.
Get any of those wrong, and you're ordering the wrong material.
But the header is just the starting point. Each opening also requires king studs on either side, jack studs to support the header, and cripple studs above the header. Windows add an additional piece to the count: a sill plate with cripple studs below it.
Now multiply that across a project with 40 windows and 20 doors. Each one has its own rough opening dimensions. Each one needs its own set of supporting members.
This is what makes Step 3 one of the more time-intensive parts of the takeoff. It's not one calculation; it's dozens of them, all requiring careful plan reading and cross-referencing.
One more thing to watch for: engineered lumber headers like LVL beams. These need to be listed separately from dimensional lumber in your takeoff. They have longer lead times and different pricing.
If, by mistake, they get grouped with standard headers at the ordering stage, you'll feel it during procurement.
Step 4: Compute the top and bottom plates
Every wall needs plates, and the kind depends on what the wall is doing. Load-bearing walls get a double top plate. Whereas, a non-load-bearing walls typically use a single.
On top of it, you're also tracking linear footage across every wall segment, applying the right configuration, subtracting for door openings, and adding back for corner laps.
On a simple, straightforward plan, this moves quickly. On a multi-level project with dozens of wall segments at varying heights and different structural designations, the tracking adds up fast. The risk isn't the formula; it's maintaining accuracy across a large number of segments without losing the thread.
Step 5: Calculate sheathing, subfloor, and roof decking
Surface area calculations for general roofing materials, wall sheathing, and subfloor all follow a similar logic: start from gross area, deduct for openings, account for panel layout, and round up to whole sheets.
But why round up, you wonder? Because a partial sheet requirement still means a full sheet on the order.
The truth is: roof decking is where complexity tends to spike. Pitch factor adjustments, overhang calculations, and anything beyond a basic gable, each adds its own layer of geometry.
This is also where miscounting hits the budget directly: sheathing and decking come in fixed panel sizes, so an off count means either a shortage or an over-order.
Step 6: Apply waste factors and finalize quantities
This is the last step, and also the one that requires the most experience.
Field cuts happen on every project. Some boards get set aside for excessive crown or bow. Temporary bracing (which won't appear anywhere on the finished drawings) still consumes real lumber. Blocking and miscellaneous framing add up differently on every job.
Getting waste factors right isn't about plugging in a standard percentage. It's about understanding the project's complexity, how your crew works, and what each component type realistically generates in terms of waste. This is also where material length optimization happens. On a large project, this final pass can make a real dent in material cost.
By the time an estimator has worked through all six steps with genuine care at each stage, they're looking at one to two full days of focused work.
No shortcuts here. That's what it actually takes to do framing takeoffs right. For framing contractors juggling multiple bids at once, that time is the central constraint.
Here’s what a complete framing takeoff should include
A thorough framing takeoff covers more ground than most people outside the estimating seat realize. Here's what a complete one actually tracks:
.avif)
Common mistakes that lead to inaccurate framing estimates
These aren't rookie errors. They show up in experienced estimating operations because the process has enough variables and enough time pressure that even disciplined teams miss things.
Misreading plan dimensions and scales
Different sheets in the same plan set can use different scales. Digital plans displayed on screen can be zoomed in and out inconsistently. A scale calibration error caught early means one correction. However, a scale calibration error caught at the time of ordering means recalculating the entire takeoff.
Ignoring waste and cutting losses
Every hour saved on a takeoff that skips proper waste calculation is borrowed time. The waste doesn't disappear; it shows up as a mid-project lumber run or a margin hit absorbed quietly at job close.
Missing specialty items like fire blocking and temporary bracing
Both are required. Neither appears reliably on architectural drawings. Both have to come from the estimator's knowledge of code requirements and field conditions. When they're missed, they're absorbed from job costs, not flagged as estimating errors.
Working from outdated or superseded drawings
A structural addendum changes a beam location. It gets distributed. It doesn't get incorporated into the takeoff before the bid goes out. The submitted bid is built on quantities that don't match the actual project. The delta surfaces during procurement or, worse, in the field.
In a competitive bid environment, estimating construction materials from the wrong revision isn't just an operational headache. It's a risk that can turn a winnable project into an unprofitable one before work even begins.
Best practices to improve framing takeoff accuracy
Standardize your estimating process with templates
A consistent template defines what gets counted, in what order, and with what assumptions. It makes omissions visible before they become problems. It makes onboarding faster. And it gives you a baseline you can improve systematically after every project closes.
Build and maintain a cut list for the field
A cut list translates takeoff quantities into actionable field instructions: grouped by size and length and organized to minimize waste. It's the document that keeps the takeoff connected to the actual build, rather than sitting in a spreadsheet that no one looks at after bid day.
Coordinate with field teams before finalizing
Your foreman knows things the plans don't show. Supplier stock conditions, site access constraints, and sequence requirements that affect material staging; these factors change quantities and assumptions. Getting that input before you finalize saves costly corrections on the back end.
Optimize material lengths to minimize offcuts
Estimating construction materials at the length level is what separates a good takeoff from a great one. Specifying which standard board lengths to order and how cuts nest into them reduces waste in a way that adds up meaningfully on large projects.
How Beam AI makes framing takeoffs faster and more accurate
Everything described above — the plan reading, the component-by-component calculations, the waste optimization, the addendum tracking — has to happen on every project, every bid cycle, under whatever deadline pressure that week brings.
For small and mid-size construction firms, that's a real ceiling. The takeoff process limits how many projects you can pursue. It limits how fast you can respond. And it concentrates risk in the manual steps where errors are most likely to slip through.
Beam AI was built to remove that ceiling.
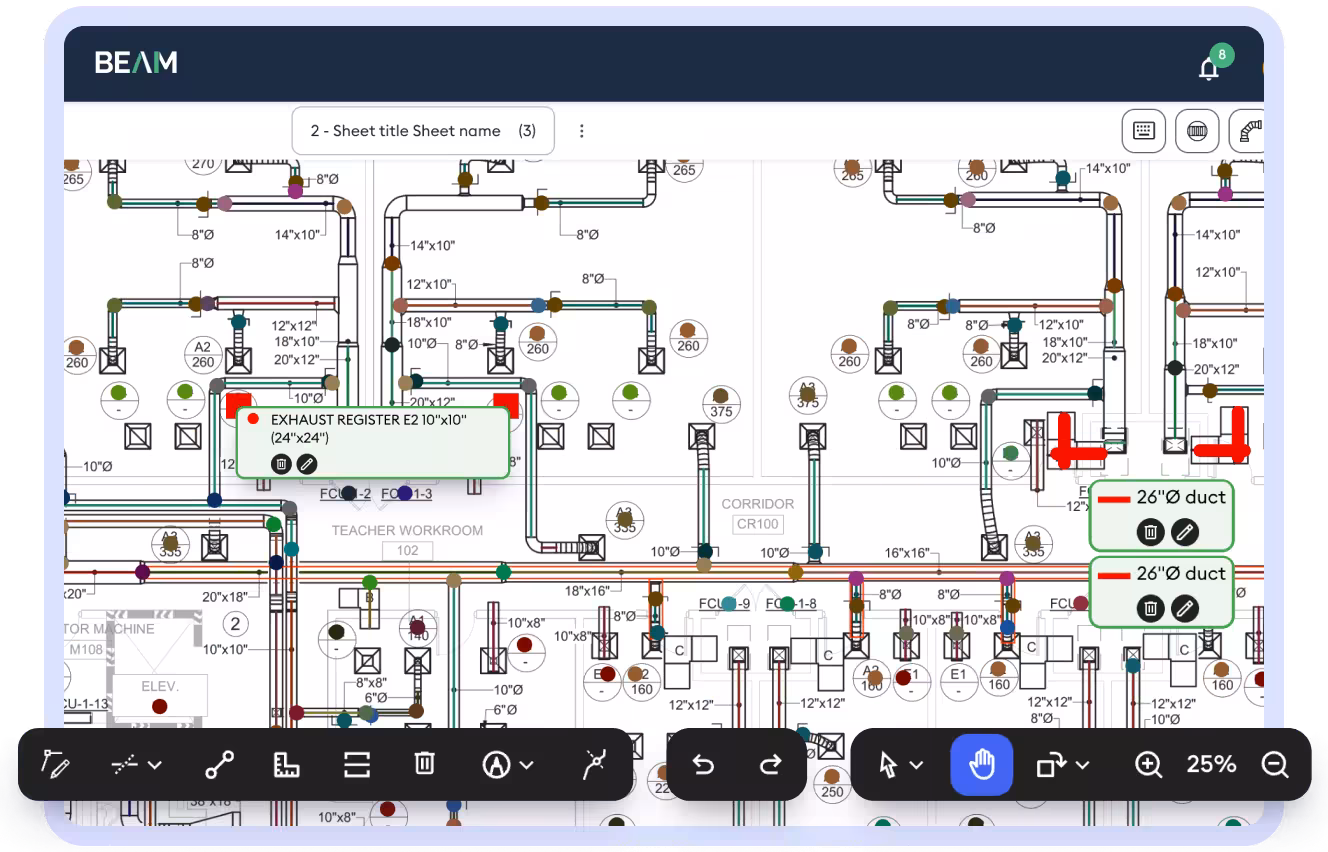
Automated quantity extraction directly from plans
Upload your PDF plan set, define the scope, and let Beam AI read your drawings and automatically extract material quantities. No manual tracing or sheet-by-sheet measurement required. This means, there’s no scope of accumulated reading errors.
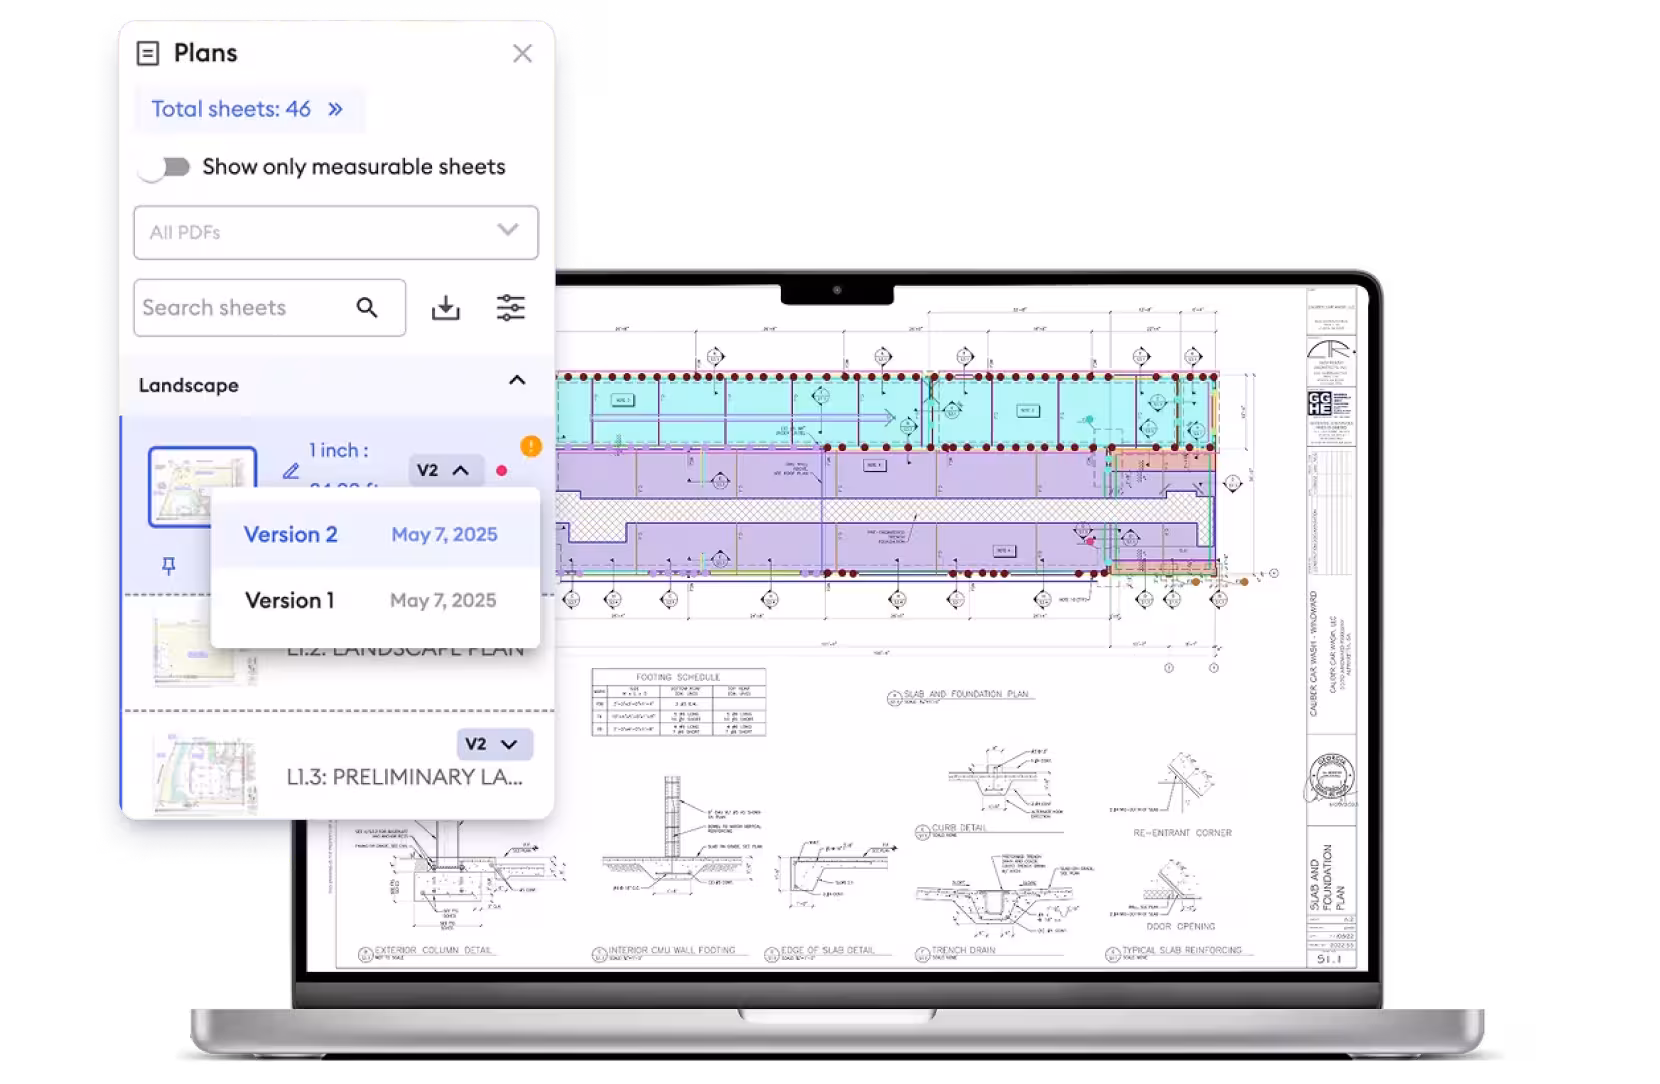
Instant revision tracking when plans change
With Beam AI, when drawing plans change mid-bid, you don't have to start over. You resubmit.
Beam AI lets you submit an addendum to an existing takeoff in just a few clicks. You can add updated sheets, flag corrections, or submit entirely new sheets that weren't part of the original scope. It then automatically detects all the changes across the old and new plans and delivers an updated, bid-ready takeoff.
Along with the updated takeoff, you also get a Variance Report. It shows you exactly what changed between versions. This saves you time that would go into manually hunting through two versions of a plan set, trying to spot the difference. It's all surfaced for you, clearly, so you can review and refine your bid with confidence.
The result: plan changes no longer mean losing time or missing a bid deadline.
How Beam AI compares to manual takeoffs
Framing contractors using Beam AI report saving upwards of 20+ hours per week on takeoff work. Several have doubled their bid volume without adding headcount because time previously spent on manual construction takeoffs is now going into high-value work such as pricing strategy, vendor negotiation, and pursuing more work.
How better framing estimates help you win and protect more bids
When your quantities are accurate and waste factors are applied correctly, you can submit a tighter bid without risking being wrong. Accurate estimating from a framing takeoff is what lets you bid the right number, one you can defend confidently in any scope conversation.
Signs your current estimating process is costing you work
- Bid opportunities are being declined because the takeoff can't be completed before the deadline
- Your estimates consistently come in above the winning bid by more than a reasonable margin difference
- Projects are won but regularly run over the material budget in the field
- Plan revisions create confusion and rework in the estimate more than once per project cycle
- Your estimating team spends the majority of their time on quantity counting rather than pricing and strategy
Each of these is a signal that the framing takeoff process, either in speed, accuracy, or both, is putting a ceiling on what your business can do. The process works. It just doesn't scale when it's done manually.
Final thoughts: from takeoff to profitable execution
A framing takeoff is where a project's profitability is decided.
Doing it manually at scale under real bid pressure is genuinely hard work. Many experienced estimators still choose to do it manually. Still, it's both time and detail-intensive, and prone to compounding errors that only surface when they're expensive to fix.
The best framing contractors and residential builders are using workflows that preserve that estimating expertise while removing the conditions under which it fails. Standardized processes. Field coordination.
And, this is where AI-powered takeoff and estimating tools like Beam AI come in. By handling the extraction and calculation automatically, the estimator's judgment goes into decisions that actually differentiate the bid, not into counting sheets and tracking revisions.
Curious to know how Beam AI handles a framing takeoff on a real project?Book a demo with us here.


.jpg)

.webp)

