



The High Price of a Failed Concrete Inspection
A failed pour is never a line item. The costs appear in three places at once, and the second and third are usually more expensive than the first.
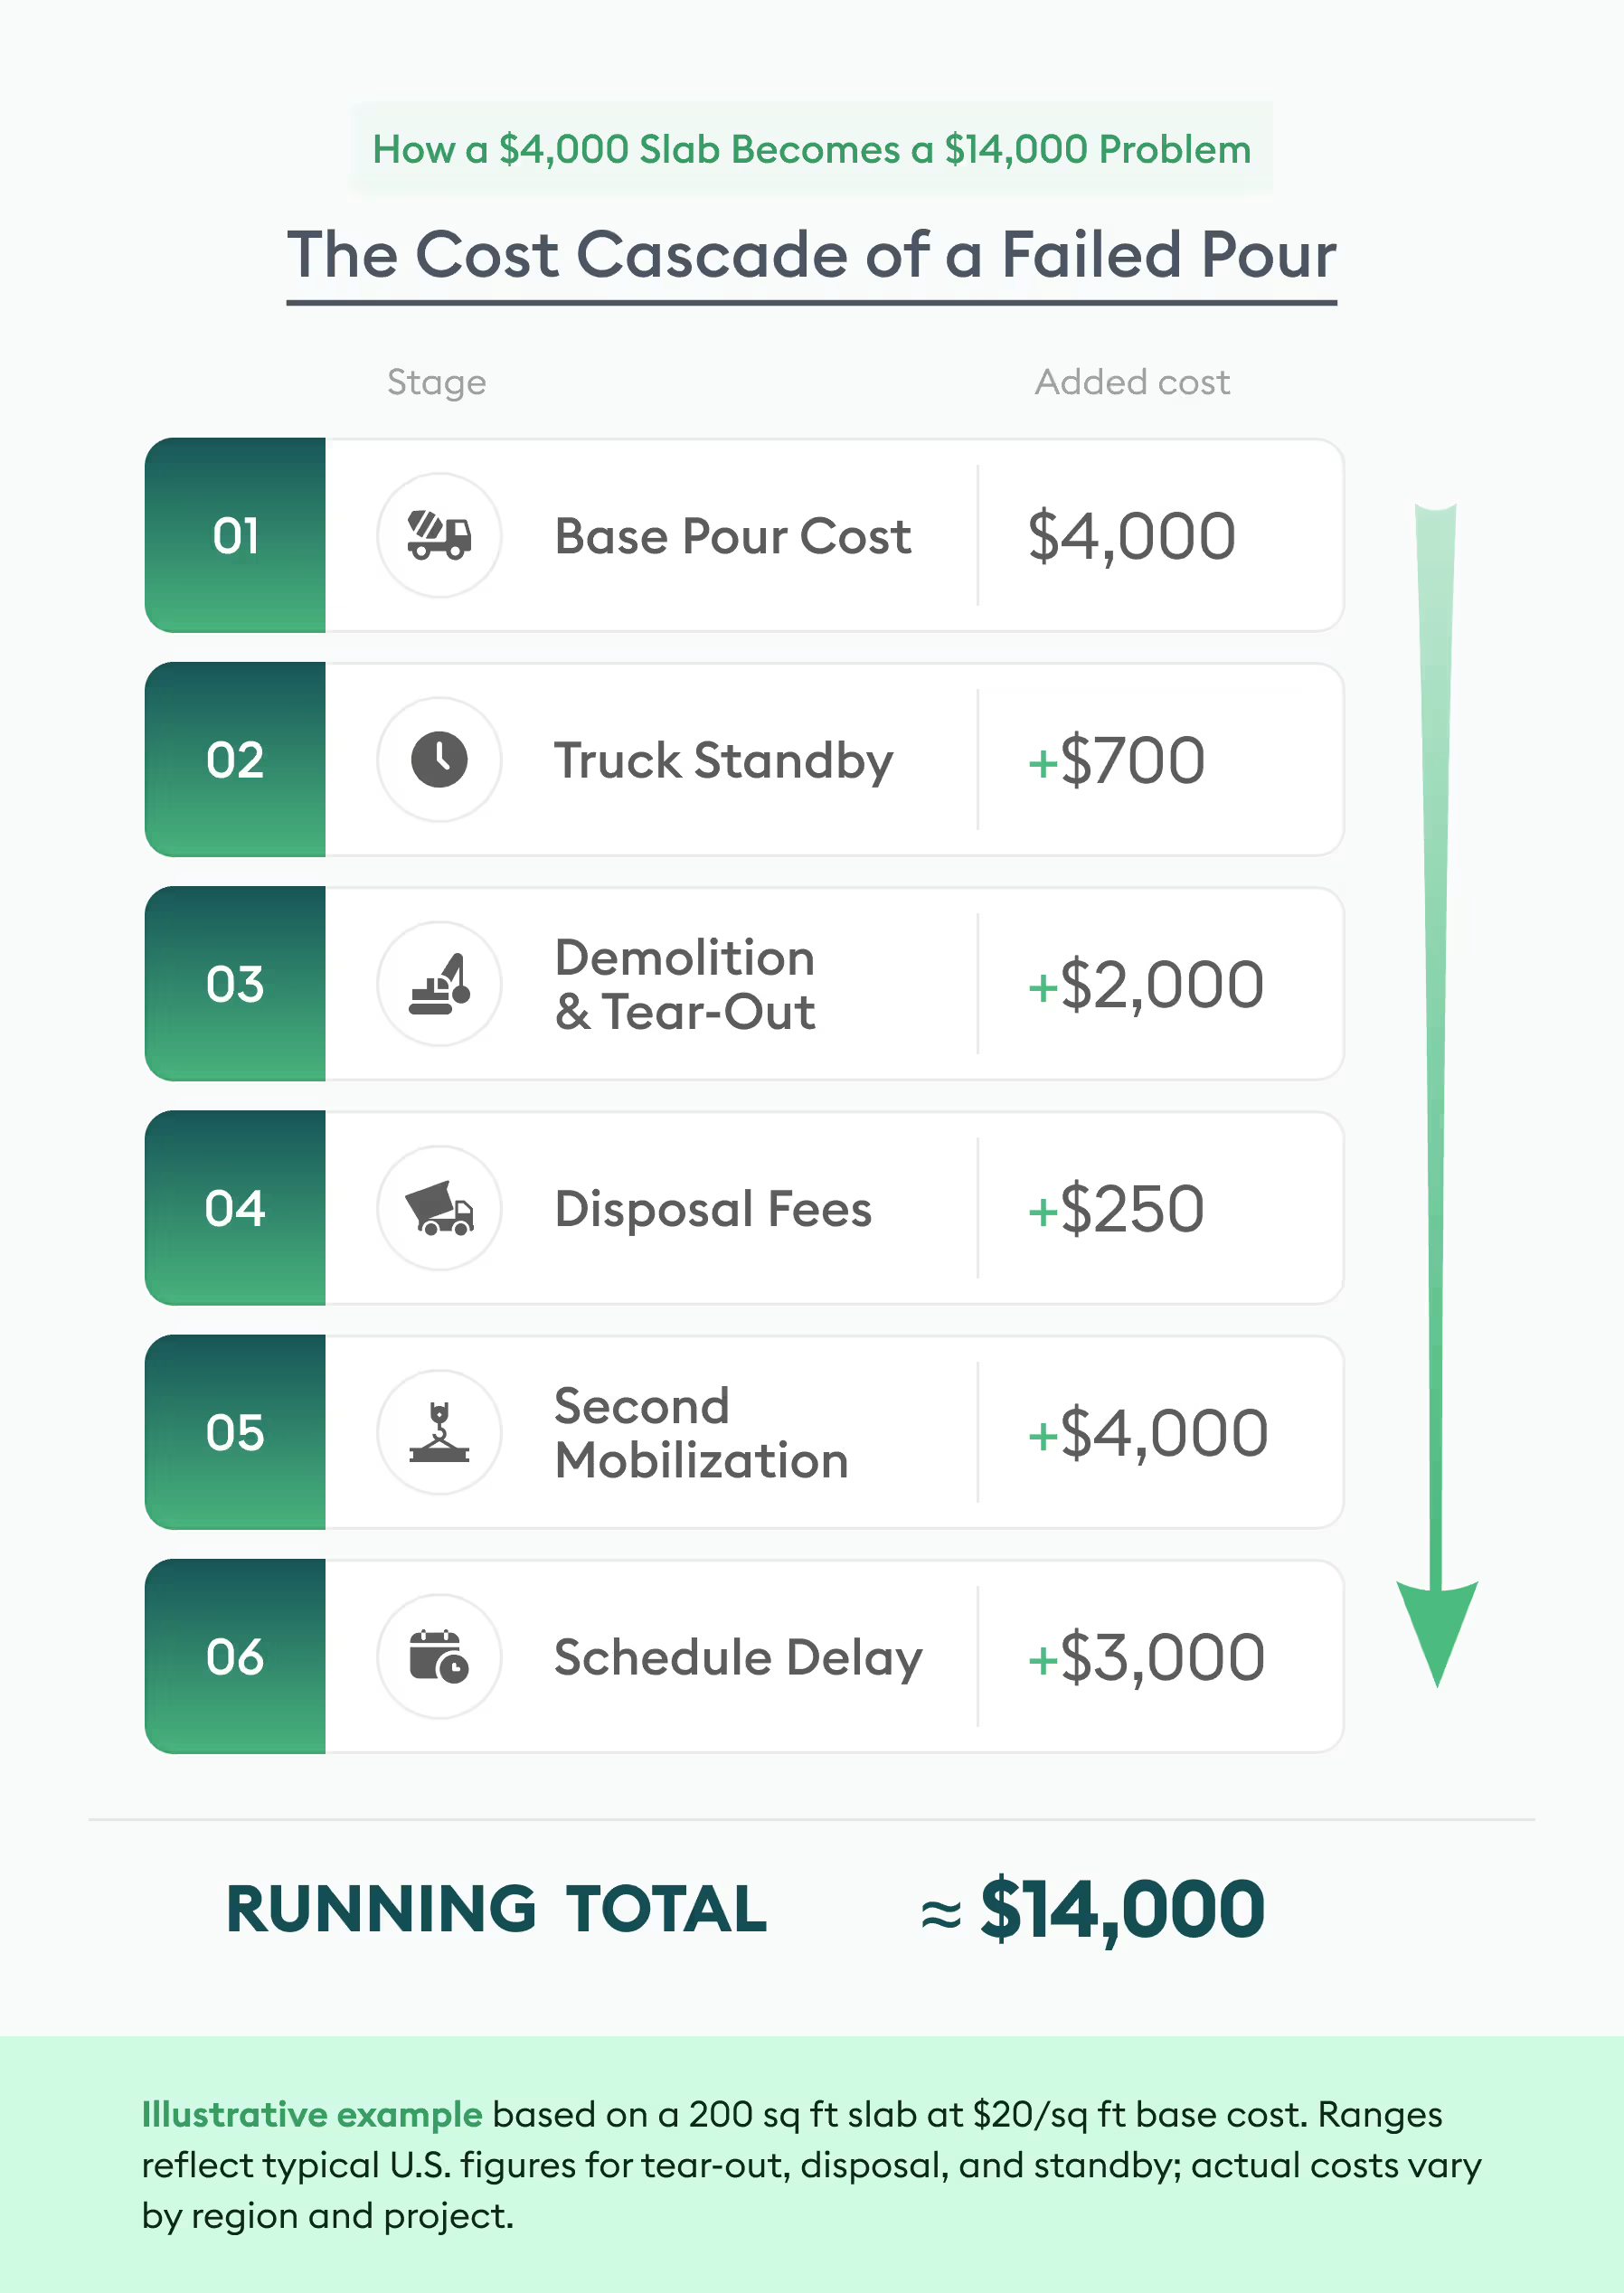
- Direct financial losses: standby fees for ready-mix trucks, wasted batch material, and tear-out and demolition costs on the rejected section.
- Project delays and schedule slippage: idle crew labor, missed milestone dates, and downstream trades that cannot start until the corrected pour cures and re-passes.
- Regulatory and legal penalties: stop-work orders, failed entries in the special inspection log, reduced structural load ratings on the affected element, and insurance or bonding compliance risk.
Industry research on field rework shows how quickly this cost adds up. A peer-reviewed analysis summarized by the American Society of Civil Engineers found that actual rework costs on completed projects are higher than contractors usually report.
The cost goes up even more when you include problems found after the project is finished. Concrete placement is one of the most common triggers behind that number, since it sits on the critical path of nearly every structure.
Top 6 Reasons Concrete Pours Fail Inspection
Improper Formwork Setup and Bracing
Formwork problems usually have little to do with the concrete pouring itself. They often start with the structure holding the concrete in place before it sets.
- The issue: unstable formwork, incorrect dimensions, unsealed gaps that leak slurry, or insufficient lateral bracing that risks a blowout under hydrostatic pressure once the concrete pouring process starts.
- What inspectors look for: form alignment against the drawings, elevation accuracy, cleanliness inside the forms, and structural integrity of the bracing system under load.
Rebar and Reinforcement Violations
Reinforcement is one of the first things checked during a pre-pour inspection, and that too quite thoroughly. It’s also easy to get it wrong when the schedule is tight.
- The issue: incorrect bar sizing or spacing, improper lap splice lengths, missing rebar chairs that leave insufficient concrete cover, or oily and dirty bars that degrade bond strength with the surrounding concrete.
- What inspectors look for: enough clearance from the subgrade, secure tie wires at each intersection, and rebar that matches the approved structural drawings. Cover depth depends on the exposure conditions. For concrete that is placed directly against soil, the American Concrete Institute's structural concrete building code requires at least three inches of cover.
Poor Subgrade Preparation
Everything placed on top of a bad subgrade inherits its problems, and those problems usually surface months after the pour, not during it.
- The issue: uncompacted subgrade, standing water, mud, or unaddressed expansive soils that lead to future slab settlement and cracking.
- What inspectors look for: soil compaction test reports, correct vapor retarder placement, and clean, dry ground conditions immediately before the concrete pouring begins.
Subgrade condition also determines which slab type and thickness are appropriate for the application. A thickness that works on a well-compacted, low-moisture subgrade can underperform badly on soil that was never tested or corrected.
Subpar Concrete Mix Design and Slump Issues
This is where a lot of avoidable concrete pouring problems begin to surface and where time pressure can make shortcuts feel tempting.
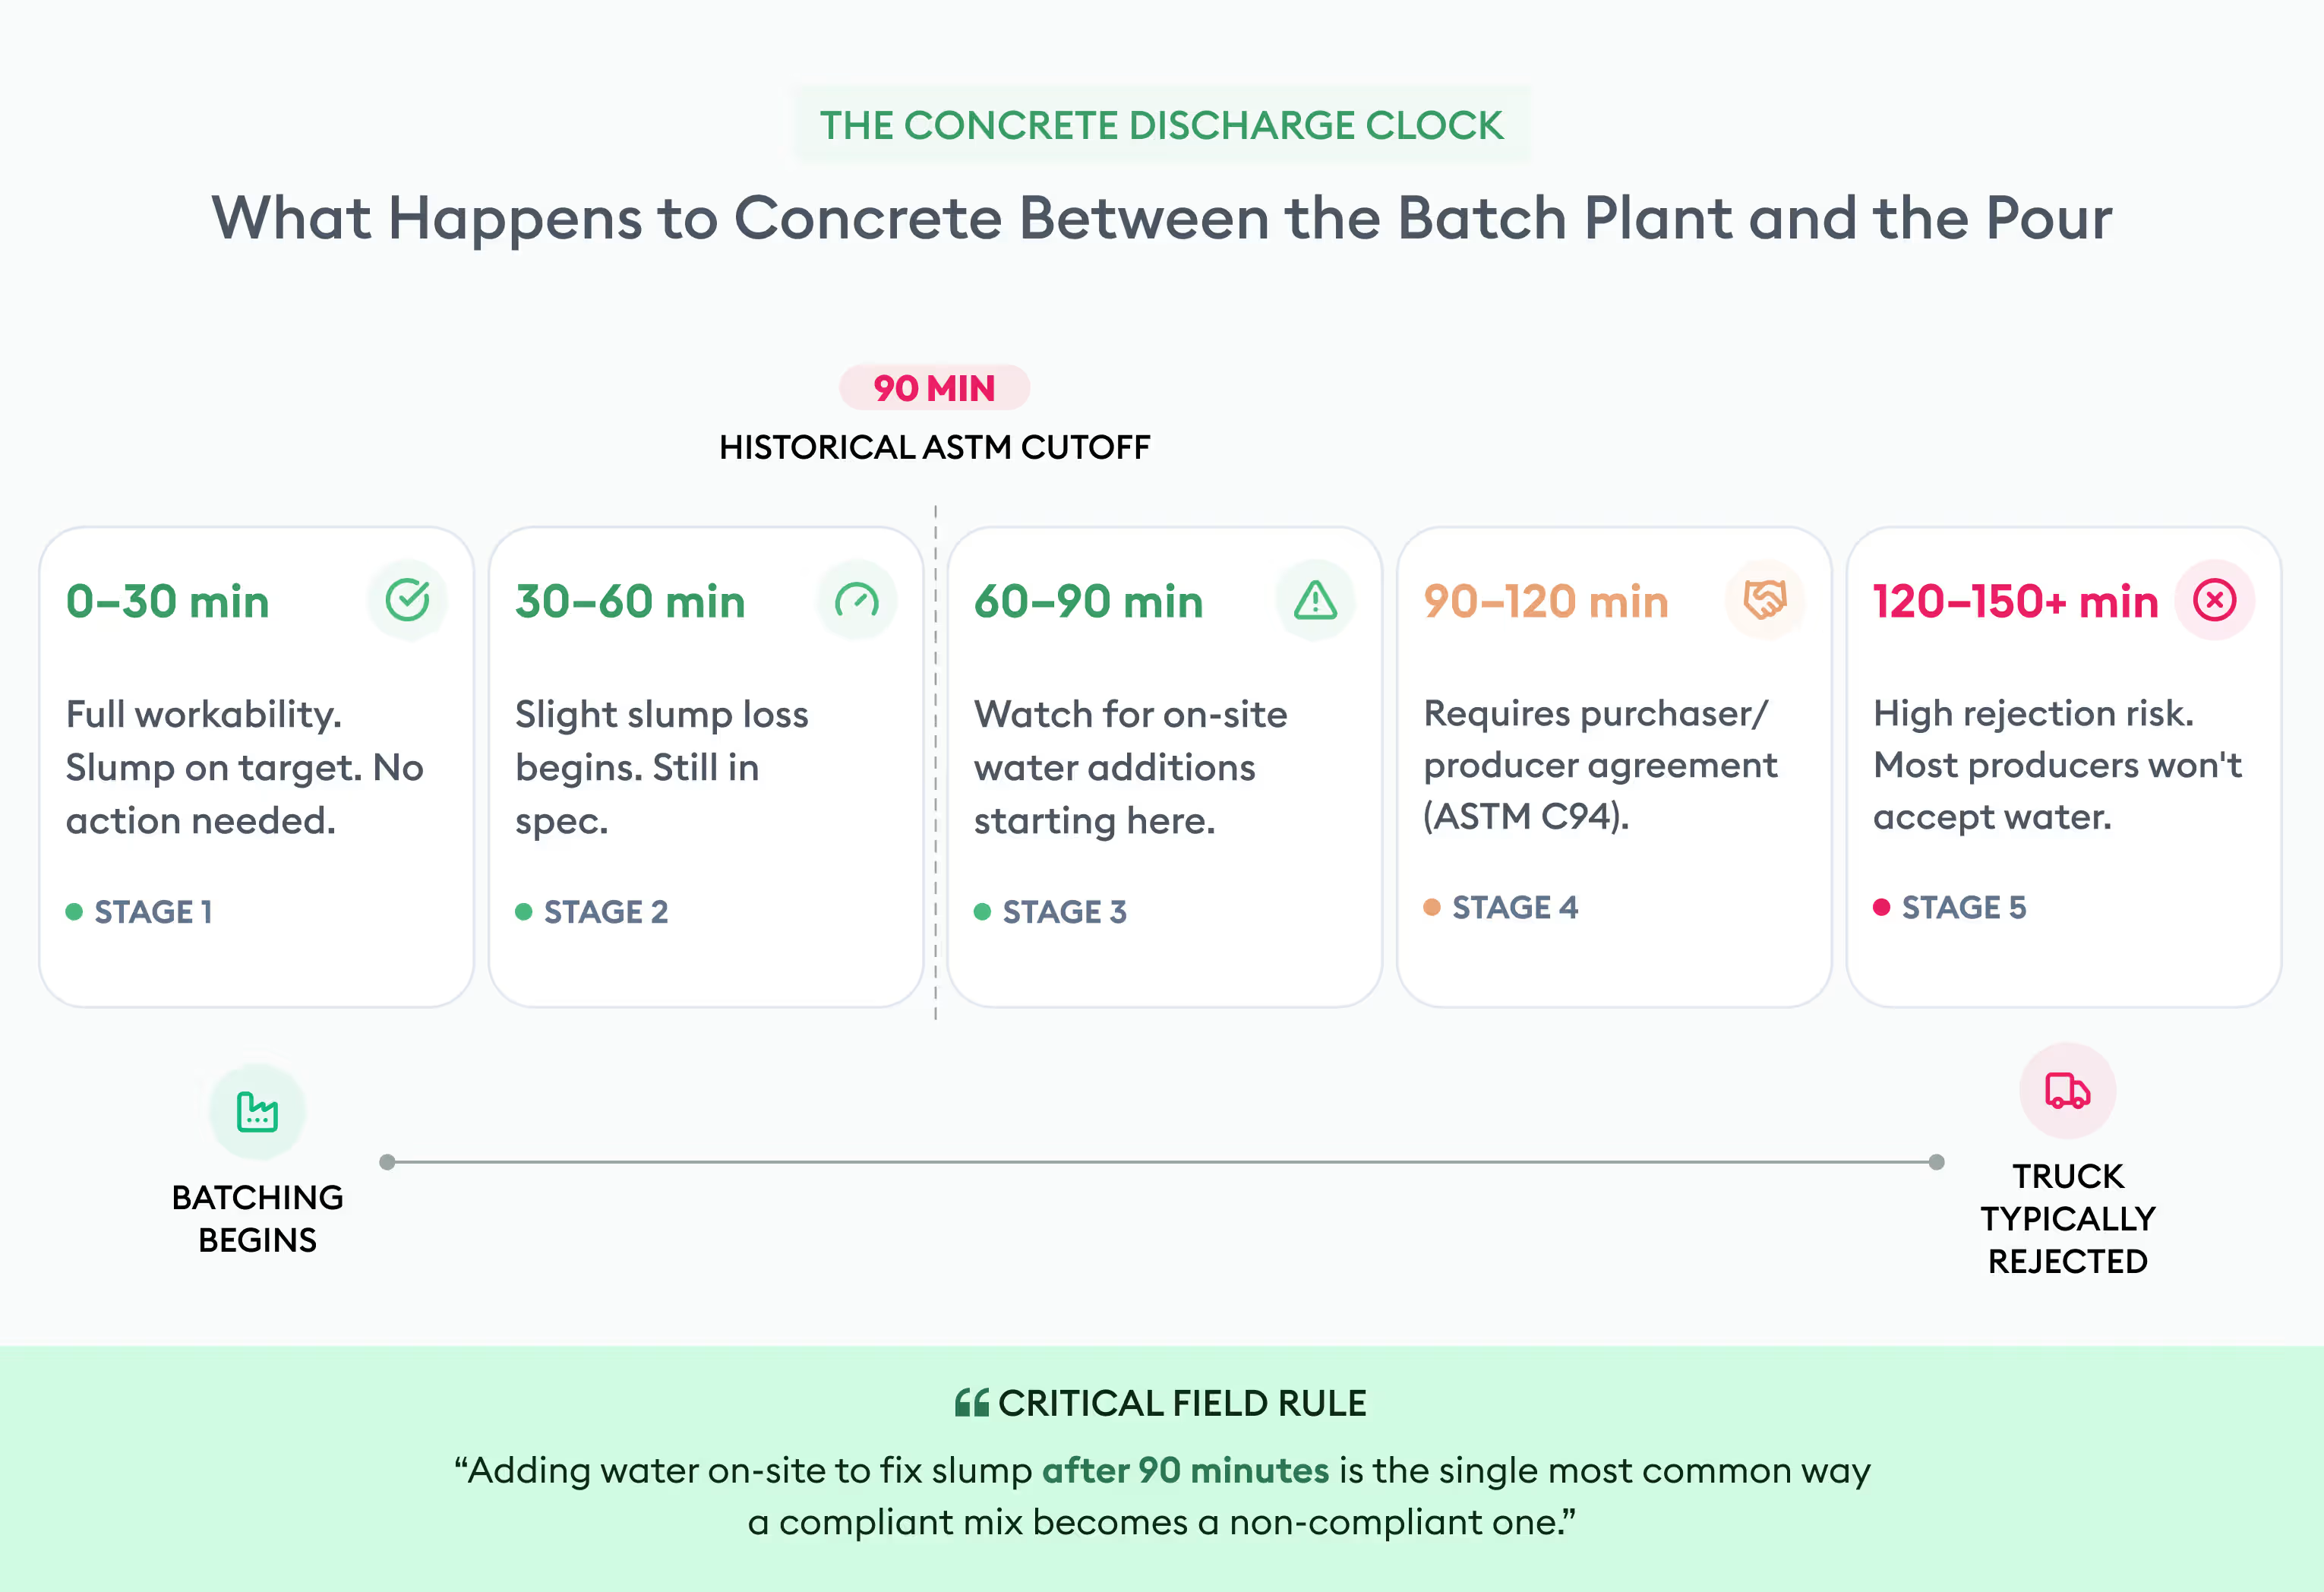
- The issue: The quality of concrete can change before it even reaches the pour. For instance, if a batch truck arrives past its agreed discharge window, extra water may be added on-site to make the mix easier to place or a mix that does not match the specified PSI for use. Even when evaluating innovative crack-prevention admixtures, understanding the downsides of self-healing concrete - such as lack of design standardization, moisture dependence, and uncertain structural strength recovery—reinforces why standard mix compliance matters. Either way, a load that sits too long or gets watered down on arrival no longer matches the mix design that was specifically engineered for the pour.
- What inspectors look for: batch tickets, slump tests against the specified range, temperature monitoring, and air-entrainment levels.
Dry pour concrete belongs in this category too, though it rarely reaches a formal inspection at all. Dry pour, or dry-pack, placement skips mixing water in beforehand and instead adds it from the top of the form. Hydration ends up uneven, strength falls well short of what a wet-mixed pour reaches, and most inspectors will not sign off on it for anything that requires a permit.
Missing MEP Embedments
A pour can look completely perfect on the surface. Yet, it may still have a problem if something underneath was missed.
- The issue: pouring over missing utility sleeves, anchor bolts, or conduit knockouts that were left off the layout or installed in the wrong position.
- What inspectors look for: pre-pour mechanical, electrical, and plumbing sign-offs, correct anchor bolt placement against the structural plan, and sleeve integrity before concrete covers them permanently.
Inadequate Equipment and Weather Planning
A good mix and well-prepared formwork can still go wrong if the crew isn’t ready to place and protect the concrete properly once it gets to the site.
- The issue: Absence of a backup vibrator at the job site can lead to honeycombing or create trapped air pockets. Poor planning for hot weather, cold weather, or rain can also affect the concrete during placement and early curing.
- What inspectors look for: A clear concrete pouring plan, working vibration equipment, and protection such as thermal blankets or evaporation retarders, all in place before the first truck arrives.
The Real Cost of a Failed Pour
The cost to pour concrete slab the first time is a known, budgeted number, and the cost to pour concrete pad follows the same logic on a smaller scale. The cost of doing either one twice rarely is since standby fees, disposal, and schedule slip are not usually built into the original estimate.
How to Guarantee a Passing Inspection: The Pre-Pour Checklist
- Review approved drawings 24 hours prior. Make sure the structural and MEP sets present on-site match the current revision of the designs, not an earlier version that is still in a crew truck.
- Check and verify rebar elevation, spacing, and cover chairs. Walk the reinforcement with a tape and a cover meter instead of eyeballing spacing against the drawings.
- Sweep forms clean before close-up. Remove trash, tie wire, and debris that would otherwise sit inside the finished slab.
- Make sure the batch mix design complies with the requirements of the task. Make sure to check the delivery ticket for the approved mix design before the pouring process starts.
- Stage field QA testing gear in advance. Slump cone, cylinder molds, and thermometers should be on-site and ready before the first load arrives.
- Run a formal internal walkthrough before the special inspector shows up. A five-minute crew walk can catch and resolve most of the issues that would otherwise be flagged during a formal inspection.
In Closing
Passing inspection comes down to doing the same six checks before every concrete pouring job: formwork, reinforcement, subgrade, mix design, embedments, and equipment. Do that every time, and you’re far less likely to run into problems later.
The good news is that most of these issues are easy to spot before the pour. A quick rebar cover check, comparing the batch ticket with the mix design, or spending five minutes clearing debris from the forms can make quite a big difference. These checks take little time and are far cheaper than finding a problem after the concrete is already in place. When crews skip these steps, it's often due to a very tight schedule. And if there's no time for such basic checks, it usually indicates the real issue has already taken root well before the pour.
A concrete pouring plan that's built on guessed quantities puts a crew in a bad spot right from the jump. Maybe the slab is thicker than what the structural drawings specify, or the rebar schedule was based on a similar job instead of the actual plans. Now the crew is left trying to fix an issue in the field that should have been caught early on paper in the first place. That risk grows on elevated work, where reinforcement and formwork drive most of the cost — here's why above-grade concrete costs more than the slab.
This is where accurate takeoff comes into the picture, and this is also where their work really pays off. Concrete takeoff and estimating software gives crews key numbers upfront, including slab thickness, reinforcement, and pour volume, all pulled directly from the plans. Nothing is based on guesswork. Since those numbers come straight from the plan, the pre-pour checklist becomes a quick run-through item instead of a last-minute scramble.
Beam AI's takeoff workflow pulls those numbers directly from uploaded drawings, so the estimator, the PM, and the crew on site are all working from the same figure instead of three different guesses.


.jpg)