


.jpg)

What is a transition strip?
Standing in a doorway with two different floors on either side of your feet is one of those small moments that decides whether a renovation looks finished or half-done. Get the transition strip right, and nobody notices it. But if you get it wrong, it's the first thing every guest trips over.
A transition strip (also called a floor transition) is a narrow piece of wood, metal, vinyl, or another material installed where two flooring surfaces meet. It gives the joint a finished look while protecting exposed edges, covering gaps, and helping manage differences in floor height. It can also be important when flooring needs room to move. Floating laminate, hardwood, and some vinyl floors, for example, need expansion space that a transition strip can cover without restricting the floor underneath.
Choosing whether you need one, and which type, can affect the finished appearance, floor movement, edge protection, and even installation requirements. A T-molding is generally used between floors of similar heights, while a reducer handles a height difference, and a threshold or end cap finishes flooring where it meets a fixed surface.
The right choice depends on what is happening where the two floors meet: Are they the same height? Are they different materials? Is one floor floating? Is the flooring ending at a doorway or fixed surface?
And this is because flooring projects are rarely just about covering square footage. The U.S. building products market saw the flooring market grow by 44% between 2020 and 2024, according to the 2025 Building Products Market Overview. As flooring projects become more varied, with multiple materials and finishes often used within the same building, details such as transitions become an important part of planning and estimating.
So here's how to tell which situation you're in.
When to use a transition strip between floors?
There is no single rule that says every flooring change requires a strip. Instead, look at the conditions at the joint.
When there's a height difference
A height difference is another clear reason to use a transition.
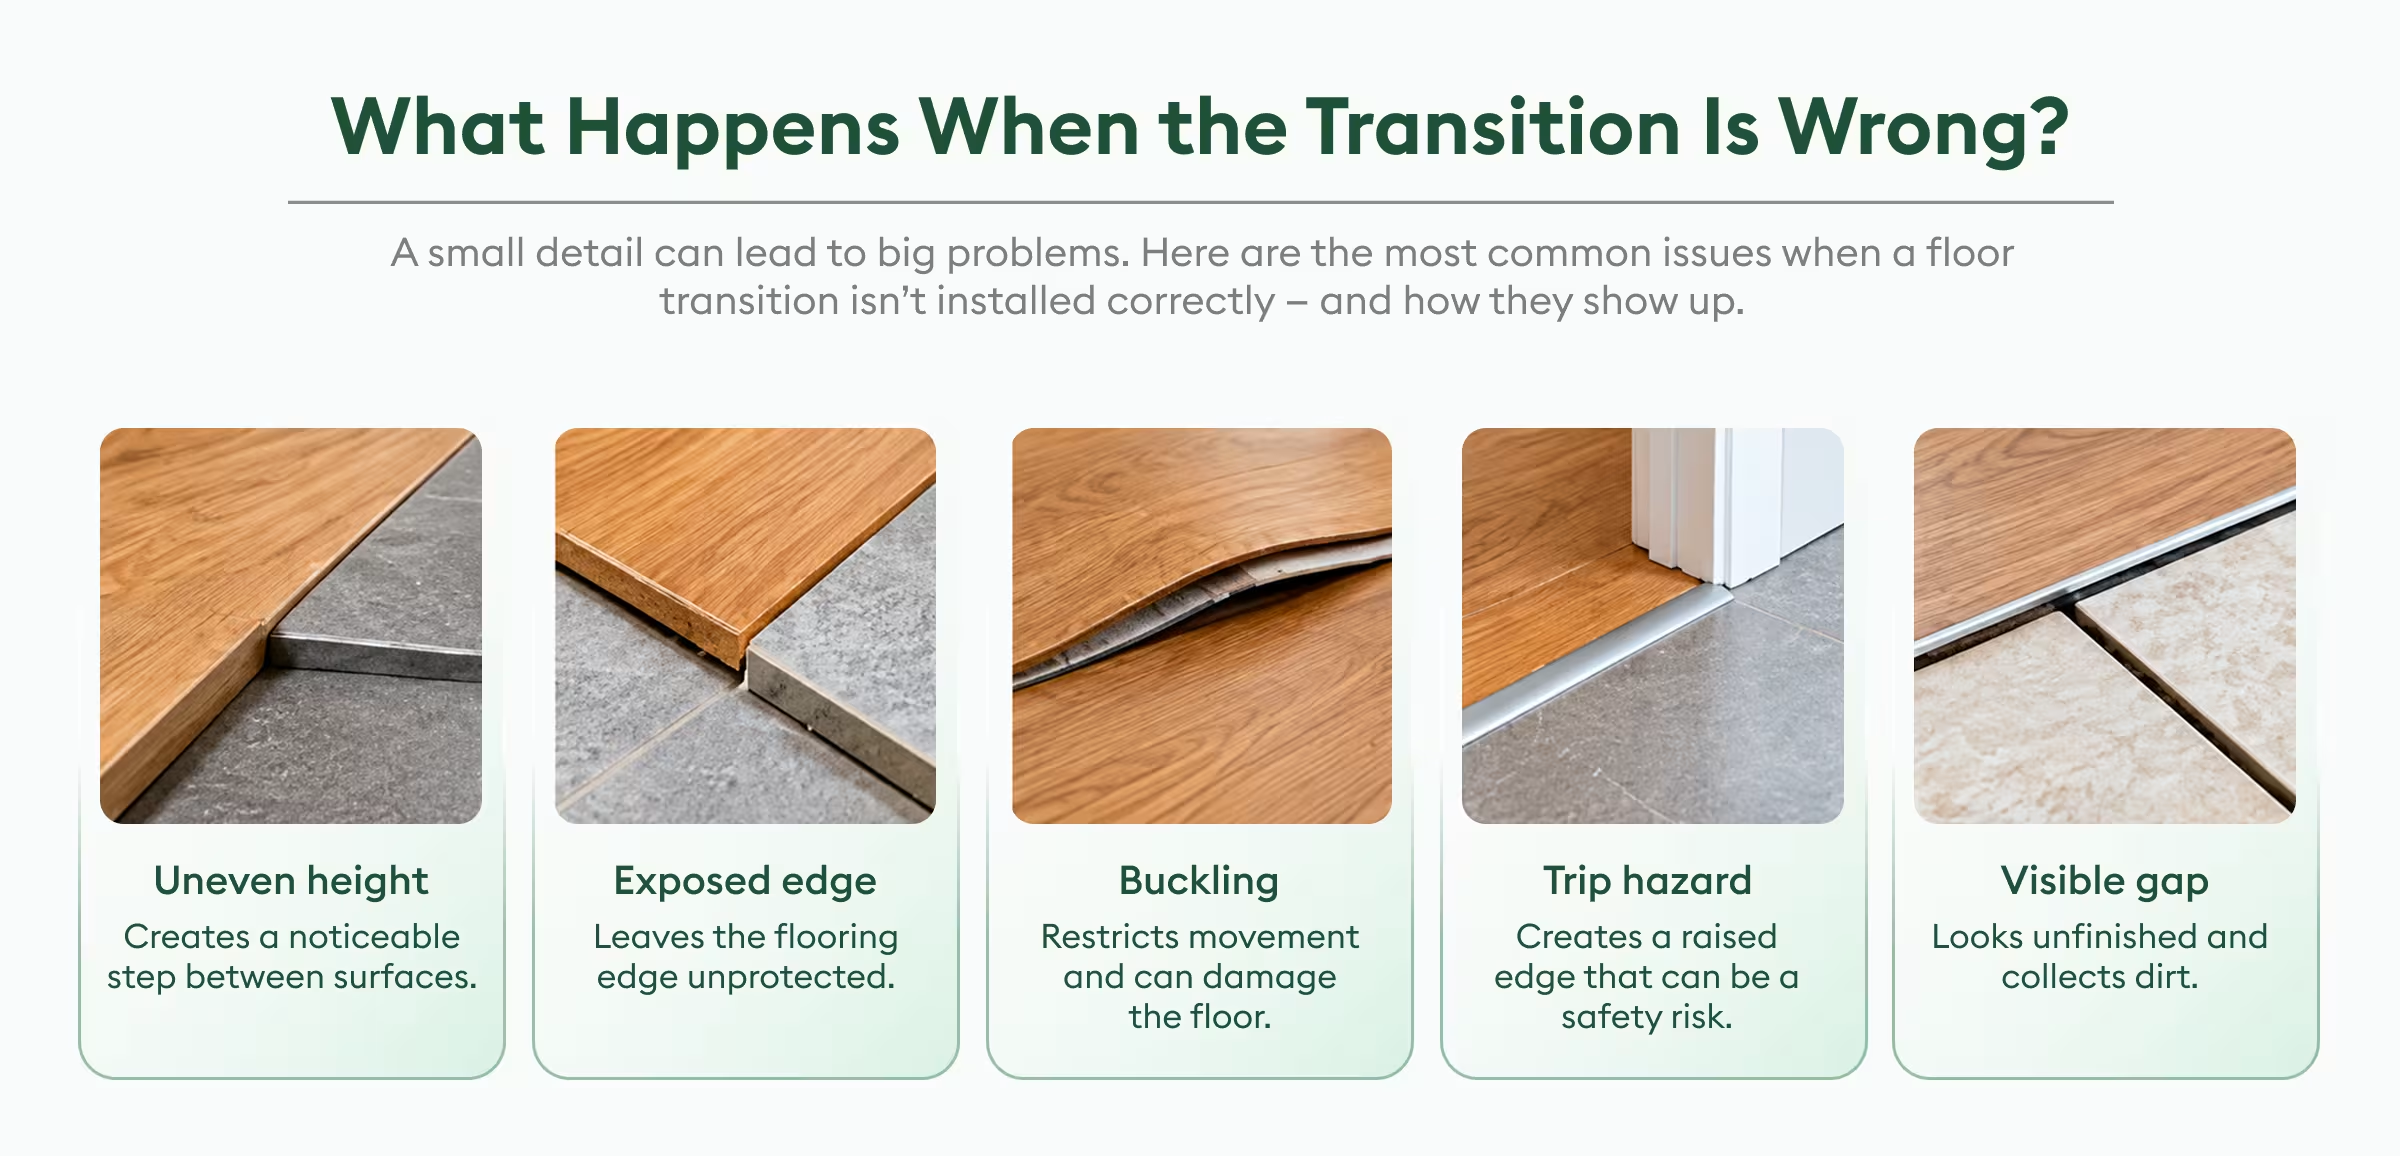
Imagine a hardwood or LVT floor meeting a thinner vinyl floor. If the two surfaces are not level, simply placing them against each other can leave an abrupt edge.
A reducer strip is designed for this situation. Its sloped profile gradually moves from the higher flooring surface to the lower one.
The goal is more than appearance. A properly selected reducer protects the exposed edge of the higher floor and creates a smoother change in elevation.
The key is to measure the finished floor heights, not just the thickness of the flooring products. Underlayment, adhesive, mortar beds, and other layers can change the final elevation.
When you're joining 2 different flooring materials
Tile, hardwood, vinyl, carpet, and laminate all expand, contract, and wear differently. Butting them directly against one another, without a strip to absorb that movement, is a common way to end up with cracked grout lines, lifted edges, or a seam that slowly opens over a season.
Whenever your flooring plan crosses from a hard surface to a soft one, or from one hard material to another, a transition strip is the piece doing the work of keeping both floors intact.
When you are installing a floating floor
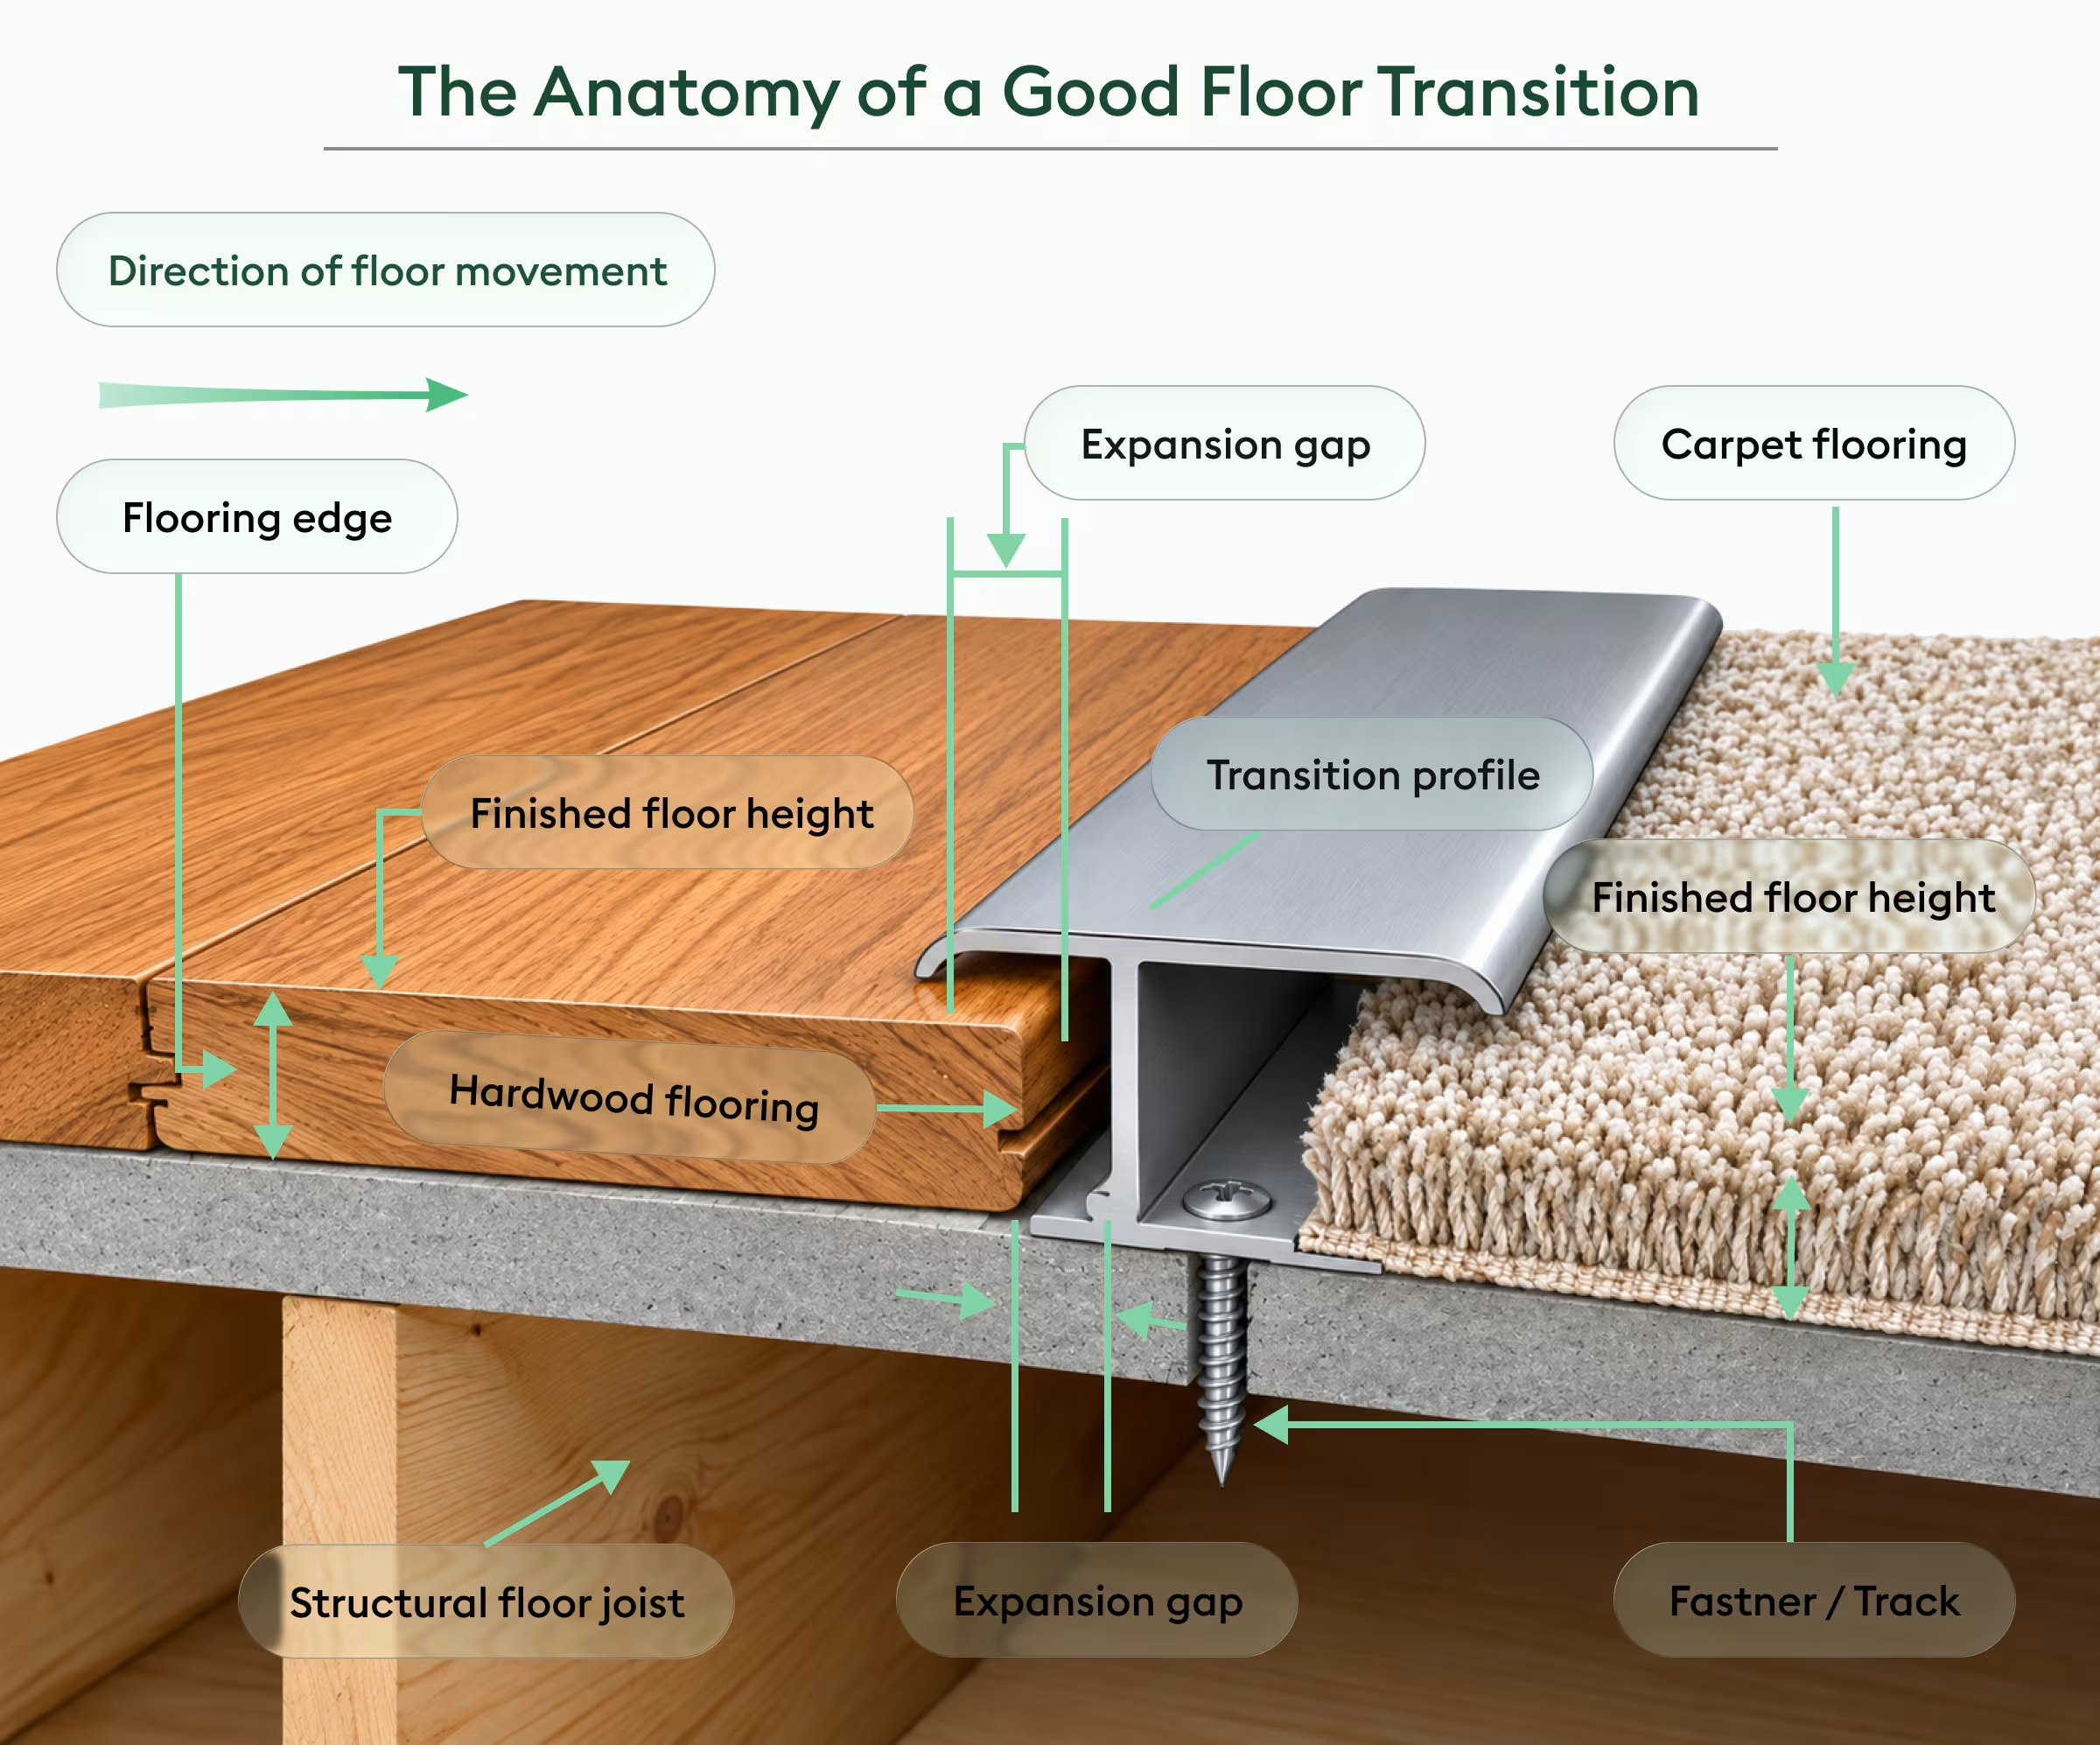
Floating floors deserve special attention. Laminate, floating hardwood, and many click-lock vinyl systems are not permanently attached to the subfloor. They need room to expand and contract as environmental conditions change.
That movement is why manufacturers specify expansion gaps.
A transition strip can cover the gap where two flooring sections meet while still allowing the floor to move. The National Wood Flooring Association, for example, notes that T-moldings can be used between floating hardwood floors and where additional expansion space is required based on floor span. It also specifies that the molding should be attached to the subfloor rather than directly to the wood flooring so the floor can continue to move.
This is an important distinction: the transition strip is not there to lock the floating floor in place. It is there to finish the joint while preserving the movement the flooring system requires.
Furthermore, flooring manufacturers commonly specify a perimeter expansion gap sized to the thickness of the product, with wider gaps often required around fixed objects like walls, cabinetry, and pipes, since perimeter spacing not only allows for seasonal expansion but also improves airflow and reduces moisture transfer at the edges. Installers who skip that gap risk the floor "peaking,” or buckling upward, when it eventually runs out of room to expand. A transition strip is what hides that gap while still letting the floor breathe.
At doorways and room boundaries
Doorways are the natural stopping point for most flooring runs, and for good reason. A transition is mostly needed wherever flooring materials change, floor heights differ, a doorway separates two spaces, or the floors were installed at different times.
Even when the flooring is identical on both sides, some installers still place a transition strip under the door swing to mark independent expansion zones, so a shift in the bedroom doesn't stress the hallway floor next to it.
When the flooring meets a fixed vertical surface
Sometimes flooring ends against a fixed surface such as a sliding glass door, a fireplace hearth, an exterior door, or a wall or other vertical obstruction.
In these situations, a threshold or end-cap profile may be more appropriate than a T-molding or reducer. The purpose is to finish and protect the exposed flooring edge while accommodating any required expansion space.
When can you skip a transition strip?
Not every seam needs a strip, and forcing one in can actually cheapen an otherwise clean room.
Same subfloor height, same material. If a floor is continuous - same product, same installation date, same plane - from one room into the next, there's nothing for a strip to solve.
Glued- or nailed-down floors. Because they're fixed to the subfloor rather than floating, glued and nailed installations don't move the way floating floors do, so they can often run from room to room without a break at the doorway.
Open-concept layouts using one material throughout. This is where opinions genuinely diverge. Some installers run luxury vinyl plank continuously across open living and dining areas for a seamless look, while others still recommend a T-molding at logical boundaries to protect the manufacturer's warranty on long, uninterrupted spans. It's worth checking your product's installation guide before deciding to skip a strip on a run that's wider than the manufacturer's stated maximum.
Types of transition strips and where they fit
Once you've confirmed you need a strip, the type depends on what you're joining:
- T-molding bridges two hard-surface floors of roughly the same height - hardwood to hardwood, tile to LVP - and is the standard choice at doorways where floors are flush.
- Reducer strips (or flush reducers) handle a height difference, sloping down from a taller floor to a shorter one, most often where laminate or engineered wood meets vinyl, tile, or concrete.
- Threshold strips mark the boundary at exterior doors or between very different floor types, such as tile meeting carpet, and often double as a water barrier in bathrooms and entryways.
- Carpet-to-hard-surface trim tucks under carpet edges to prevent fraying while giving the adjoining hard floor a clean, finished edge.
- Seam binders, wider than most other strips, are used to join two wood floors of equal height when a wider visual break is wanted, such as between very different plank directions in an L-shaped space.
Material matters too. We say this because aluminum and brass hold up well in high-traffic commercial settings, while wood and matched-laminate strips blend in better for residential jobs where you want the transition to disappear rather than stand out.
How to properly install a transition strip
Most transition strips go in one of three ways: nailed or screwed to the subfloor through a pre-drilled track, glued down with construction adhesive, or snapped into a track system that lets the strip float slightly with the floor.
The method should follow the flooring, and not the other way around. For example, a floating laminate or LVP floor needs a strip anchored to the subfloor itself, never face-nailed through the flooring planks, or you've effectively locked a floor that was designed to move.
The following are a few details that help separate a clean job from one that you need to revisit again and again:
- Measure the gap before you shop. Different transition profiles are built for different rise heights, so know your height difference (in fractions of an inch) before picking a T-molding, reducer, or ramp.
- Match the finish, not just the color. A strip that's close in tone but has a different sheen or grain pattern than the surrounding floor tends to stand out more than a slightly bolder contrast color would.
- Leave the floating floor expansion gap alone. Don't caulk or glue a floating floor tight against the strip on both sides — it defeats the purpose of the gap entirely.
- Check manufacturer specs for floating floors. Warranty terms often hinge on using the transition profile the manufacturer sells or approves for that specific product line.
For a single room or doorway, this is a manageable weekend project with a miter saw and a tape measure. For a whole-house flooring changeover with several material transitions, most homeowners bring in a flooring contractor - partly for the finish work, and partly because getting the material list right across multiple rooms is easy to get wrong without a proper takeoff.
Why transitions should be included in the flooring takeoff
For estimators, transition strips are easy to miss because flooring quantities are usually thought of in square feet.
But a complete flooring takeoff can include much more than floor area. It may also include baseboards, underlayment, adhesives, edge details, and transitions. Understanding how flooring estimators handle complex projects can help ensure these details are not overlooked.
Beam AI's flooring takeoff guide highlights transitions and edge details as part of the quantity takeoff process. Its flooring takeoff workflow also identifies the number of transitions as a quantity that needs to be measured separately from floor area.
This matters because a project can have plenty of flooring material but still be missing the accessories needed to install it properly.
A simple example: A project has 15,000 square feet of LVT across multiple rooms. The flooring quantity may be correct, but if the estimate misses 25 doorway transitions, the final material and installation scope is incomplete.
That is why you should review transition quantities alongside the floor finish schedule, room layouts, and specifications - and why flooring estimating software is worth using on multi-room jobs, where it flags these transitions automatically instead of leaving them to a manual count.
How to estimate transition strips
Transition strips are generally measured by linear length or count, depending on the project and how the material is purchased.
Start by reviewing the drawings and finish schedules to identify where different flooring types meet.
Then:
- Mark every flooring change. Identify where tile, carpet, vinyl, hardwood, laminate, or other flooring materials meet.
- Check the finished floor heights. Determine whether the joint requires a T-molding, reducer, or another profile.
- Review doorways and room breaks. Check whether separate flooring runs require transitions.
- Check floating-floor requirements. Review the manufacturer's requirements for expansion gaps and maximum floor spans.
- Measure the transition length. Measure each doorway or floor break in linear feet.
- Count individual pieces where required. Some products are purchased as individual moldings rather than by continuous linear footage.
- Check specifications and product requirements. Confirm the required profile, material, finish, and installation method.
- Include waste where appropriate. Account for cuts and offcuts when determining the quantity to order.
This is where a detailed quantity takeoff becomes useful. A takeoff is not simply about measuring the main material. It is about capturing the components needed to build the complete scope.
Top mistakes when estimating floor transitions
- Counting only the flooring area. The most common mistake is calculating square footage and stopping there. Flooring accessories such as transitions, baseboards, adhesives, and underlayment can represent additional material and labor that needs to be priced.
- Assuming every doorway needs a T-molding. Not every doorway requires the same profile. The right choice depends on the flooring type, height, installation method, and manufacturer requirements.
- Using a reducer when the floors are level. A reducer is designed to manage a height difference. That’s why, if the floors are already at the same height, a T-molding may be more appropriate.
- Forgetting floating-floor expansion requirements. A floor may look fine when it is installed but develop problems later if the required expansion space has not been maintained.
- Measuring product thickness instead of finished height. Two flooring products can have similar thicknesses but end up at different elevations because of underlayment, adhesive, substrate preparation, or other layers.
- Ignoring the specifications. Flooring manufacturers may specify particular transition profiles, expansion breaks, or installation conditions. Those requirements should be checked before finalizing the estimate.
Concluding thoughts
So basically, a transition strip earns its place wherever two floors are at odds, be it in terms of height, material, or the amount of seasonal expansion.
Where floors agree, you can mostly let them run together. However, if you are uncertain, you can check the height difference, identify if one of the floors is floating, and compare the type of strip you have to the one you see. It is a small thing, but it is the one that keeps all floors in the house functioning without conflict with each other.






.webp)

