



What Is Dripline?
A dripline is a flexible plastic irrigation tube with built-in emitters that release water slowly and evenly along its length. It is typically made from polyethylene and has small emitters installed at regular intervals inside the tubing. When the system is pressurized, water travels through the tube and exits through these emitters at a controlled rate.
Unlike traditional sprinkler irrigation, which distributes water through spray patterns, drip line irrigation delivers water directly to the areas where plants need it. The tubing can be installed on the surface, underneath mulch, or below the soil, depending on the application. Its flexibility allows contractors to run it along planting beds, around trees, through shrub areas and across irregular landscape layouts.
A typical dripline system includes more than the tubing itself. Depending on the design, the irrigation layout may also include:
- Mainline and lateral piping
- Filters
- Pressure regulators
- Control valves
- Connectors and fittings
- Flush valves
- End closures
- Emitters
- Backflow prevention components
- Irrigation controllers
These components work together to deliver consistent water throughout the system.
What Are the Standard Dripline Pipe Sizes?
A common landscape dripline size is 16 mm outside diameter (OD), with approximately 14 mm inside diameter (ID). Some landscape dripline products use approximately 13 mm ID tubing. Pipe dimensions can vary by manufacturer so fittings should always be matched to the specific tubing size and product series.
Diameter affects flow capacity, pressure loss and fitting compatibility. When selecting dripline, contractors should check the tubing's OD and ID along with the manufacturer's recommended connectors, valves and end fittings.
What Is Dripline Wall Thickness?
Wall thickness affects durability, flexibility and expected service life. Dripline commonly has a wall thickness of about 0.9-1.2 mm, while drip tape is much thinner, typically around 0.15-0.3 mm.
The thicker wall of dripline makes it better suited to permanent or longer-term landscape installations, while thinner drip tape is generally used for shorter-term agricultural applications.
How Long Does Dripline Last?
Dripline can last approximately 10-30 years when properly selected, installed and maintained. Drip tape typically has a shorter service life of around 1-5 years. Actual lifespan depends on factors such as material quality, UV exposure, water quality, pressure, installation method and maintenance.
How Does Dripline Work?
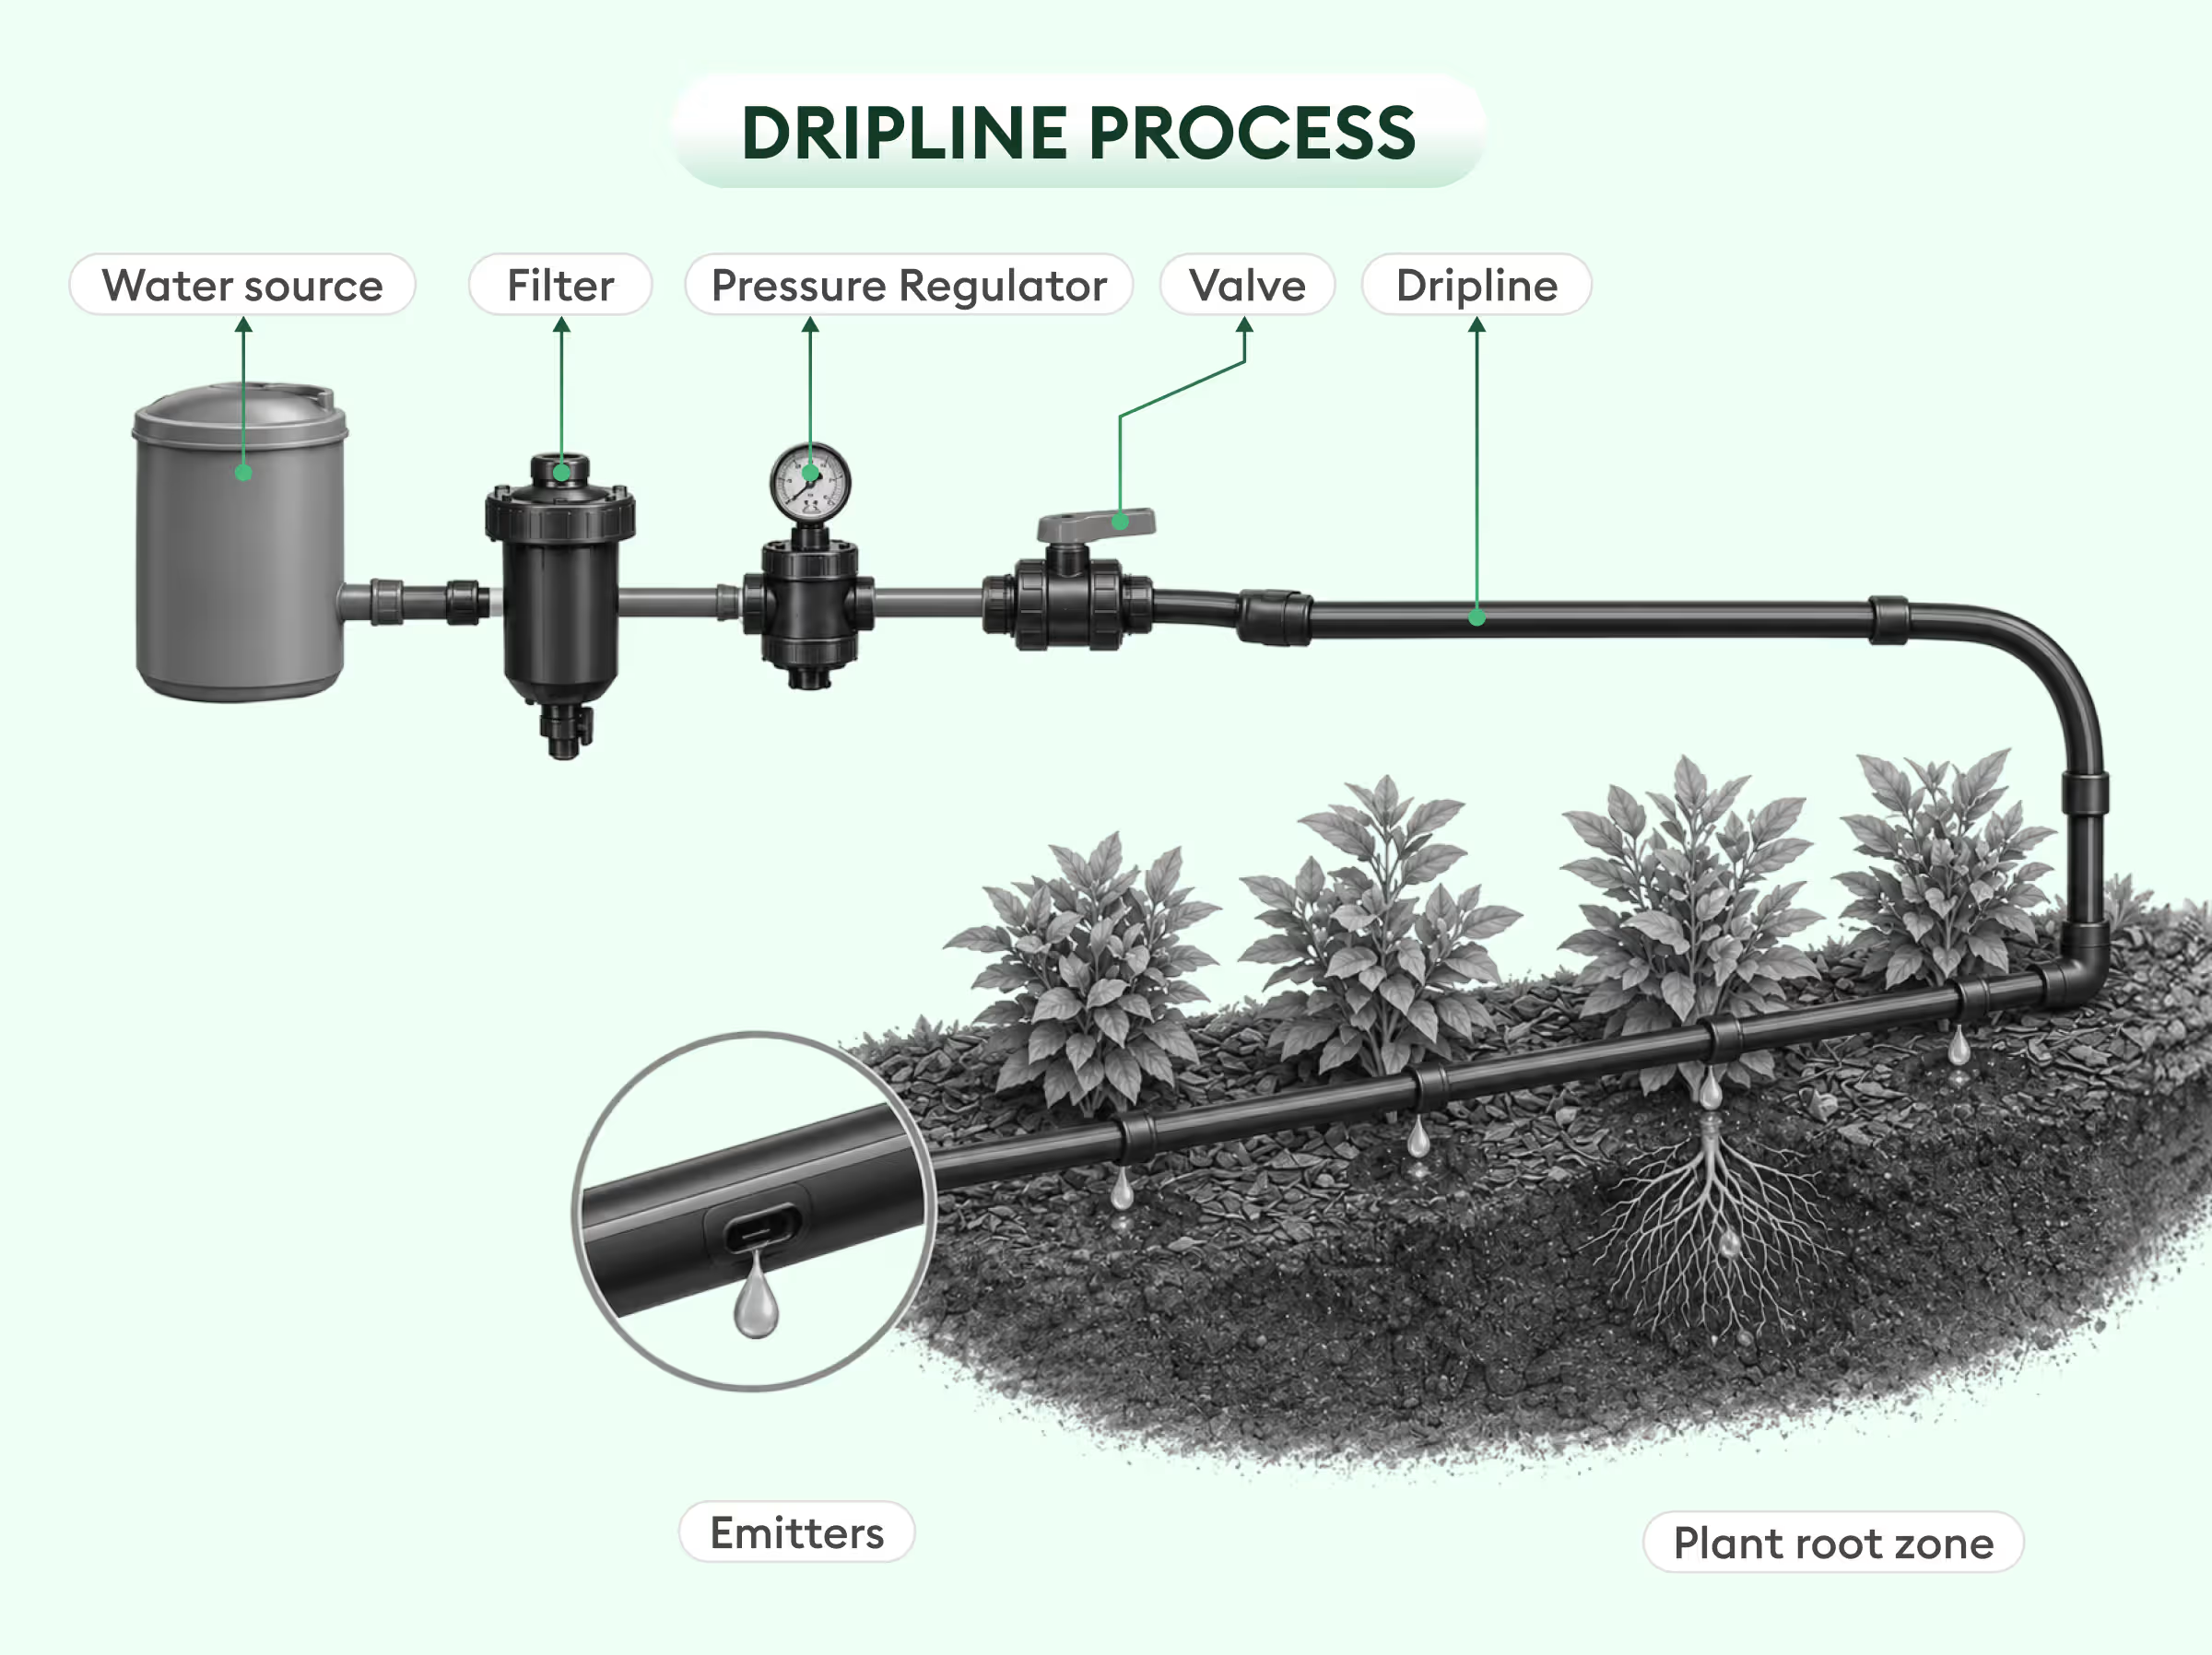
Dripline works by moving pressurized water through a network of tubing and releasing it through evenly spaced emitters.
The emitters regulate the amount of water discharged at each point. Instead of releasing a large volume of water over a short period, they deliver smaller quantities over a longer period.
Filtration is particularly important because small emitters can become clogged by sediment and debris. Pressure regulation helps maintain consistent operation and prevents excessive pressure from damaging the tubing or affecting the uniformity of water delivery.
The actual dripline flow rate depends on the emitter flow rate, dripper spacing, tubing size, operating pressure, and total length of the run. These factors need to be considered when designing and estimating an irrigation system.
Dripline Flow Rate Explained
A typical dripline emitter may have a flow rate of about 1-4 L/hr per dripper, depending on the product and application. The total flow through a dripline run depends on the number of emitters, their spacing and individual flow rate.
For example, closer dripper spacing increases the number of emitters operating along a given length of tubing, which increases the total water demand.
How Does Pump and Zoning Affect Dripline Design?
The available water supply needs to be compared with the demand of each irrigation zone. For example, if a zone requires 10 L/min but the available supply is only 5 L/min, the system needs to be divided into separate zones so the demand does not exceed the available supply.
Zoning also helps manage pressure and flow across longer runs or areas with different irrigation requirements.
Dripline Filtration
Filtration is a critical part of dripline irrigation because the small passages inside emitters can become blocked by sediment, debris and other particles in the water. A suitable filter should be installed upstream of the dripline and selected according to the manufacturer's requirements and the quality of the water source.
Regular filter inspection and cleaning can help maintain consistent emitter flow and reduce clogging. Filtration requirements may differ between municipal water, well water, reclaimed water and other sources.
Dripline vs. Drip Tape: What Is the Difference?
Dripline vs. drip tape is a common point of confusion because both systems deliver water through tubing with built-in emitters.
The main difference is durability and intended application.
The right choice depends on the project. Permanent landscape irrigation generally favors durable dripline, while agricultural operations may use drip tape when systems are installed and removed according to crop cycles.
How Do You Choose Dripline?
The right dripline depends on the application, planting layout, available water supply and installation conditions. Key specifications to compare include color, dripper spacing, flow rate, pipe diameter and pressure compensation.
How Do You Choose Dripline Color?
Dripline color can help identify its intended application. Common color coding includes:
- Purple for effluent or reclaimed-water applications
- Brown for landscape applications
- Black for other common irrigation applications
Color conventions can vary by manufacturer and local requirements, so the product specifications should be checked before installation.
How to Choose the Right Dripper Spacing
Dripper spacing refers to the distance between individual emitters along a dripline.
Common spacing options include 6, 12, 18 and 24 inches, although manufacturers offer many configurations for different applications.
The appropriate spacing depends on factors such as:
- Plant type
- Soil characteristics
- Planting density
- Landscape layout
- Required water volume
- Installation method
Dense planting beds may require closer spacing so water reaches multiple plants across the area. Larger plants or less densely planted areas may use wider spacing.
Dripper spacing also affects material calculations. A project using closer emitter spacing may require a different product configuration than one using wider spacing even if the overall length of tubing remains the same.
Dripper Spacing for Different Applications
Dripper spacing refers to the distance between individual emitters along a dripline.
Common spacing options include 6, 12, 18 and 24 inches, although manufacturers offer many configurations for different applications.
The appropriate spacing depends on factors such as:
- Plant type
- Soil characteristics
- Planting density
- Landscape layout
- Required water volume
- Installation method
Dense planting beds may require closer spacing so water reaches multiple plants across the area. Larger plants or less densely planted areas may use wider spacing.
Dripper spacing also affects material calculations. A project using closer emitter spacing may require a different product configuration than one using wider spacing even if the overall length of tubing remains the same.
Dripline Spacing Chart
The correct spacing should be based on plant requirements, soil conditions and the manufacturer's recommendations rather than spacing alone.
What Is Dripline Flow Rate?
The dripline flow rate is the amount of water delivered by the system over a specific period. It is influenced by the flow rate of each emitter and the number of emitters operating along the line.
For example, a dripline with emitters spaced every 12 inches will have twice as many emitters per 100 feet as a line with 24-inch spacing. If each emitter has the same flow rate, the total flow requirement will also change.
This is why irrigation estimating cannot rely on linear footage alone. A complete irrigation takeoff may need to account for tubing length, emitter spacing, emitter flow, zones, valves, and other system components.
What Is Dripline Installation?
Dripline installation starts with preparing the irrigation layout and determining where the tubing needs to run.
A typical installation involves:
- Reviewing the irrigation or landscape plan.
- Identifying planting areas and irrigation zones.
- Installing the required mainline and lateral connections.
- Adding filters and pressure regulation.
- Connecting the dripline to the irrigation network.
- Laying the tubing according to the planting layout.
- Securing the tubing and installing end closures or flush points.
- Testing the system for leaks, pressure and consistent water distribution.
Installation requirements vary by project. Tubing installed beneath mulch or soil requires different considerations than exposed tubing. Long runs may also require careful zoning and pressure management.
For estimators, these installation details matter because the quantity takeoff needs to reflect the actual irrigation design rather than simply measuring the planting area.
What Fittings Are Used With Dripline?
Dripline fittings connect tubing to the irrigation system and allow installers to create turns, branches, end points and zone connections. Common fittings include couplings, elbows, tees, adapters, valves and end closures. Fitting compatibility depends on the dripline's diameter, wall thickness and manufacturer specifications.
When estimating dripline, fittings should be counted separately rather than assuming that linear footage represents the complete material requirement.
How Long Can a Dripline Run?
There is no single maximum run length that applies to every dripline product. Maximum run length depends on tubing diameter, emitter flow rate, dripper spacing, operating pressure, elevation changes, and the manufacturer's specifications.
As a general reference, dripline runs are often designed in the range of 50-400 m, but the actual recommended maximum can be much shorter depending on the product and system conditions. Always check the manufacturer's specifications before setting the run length.
Longer runs can experience pressure loss and uneven water distribution. When a run exceeds the practical capacity of the system, the irrigation layout may need to be divided into zones or shorter runs.
How Should Dripline Be Stored?
Dripline is commonly supplied in coils, with landscape products often available in lengths of approximately 50-400 m. Longer coils can reduce the number of connections but may be more difficult to handle and store.
Coiled tubing can also develop recoil or memory after being unwound. Proper handling and securing during installation can help keep the tubing in the intended layout.
Where Is Dripline Used?
Dripline is used wherever plants need targeted and controlled irrigation. Its flexibility makes it suitable for both small residential landscapes and larger commercial or agricultural applications.
Garden Beds and Landscaped Areas
One of the most common applications of dripline is landscape irrigation.
Contractors can install dripline across flower beds, planting areas, shrub borders, and other densely planted spaces. The tubing can be arranged in parallel rows or curved around planting areas to provide relatively uniform coverage.
For commercial landscaping projects, the irrigation plan may include hundreds or thousands of linear feet of dripline. Estimators therefore need to account for both the tubing and the associated fittings, valves, and connections.
Trees and Shrubs
Trees and larger shrubs can also be watered with dripline.
Rather than placing the tubing directly against the trunk, installers can arrange it around the plant's root zone. A loop or ring pattern can be used around trees so that multiple emitters distribute water across the root zone rather than concentrating water at a single point.
As the tree grows, the layout may be adjusted to provide water over a larger portion of the root area.
This application is particularly useful in landscaped commercial properties, parks, streetscapes, and other areas with permanent plantings.
Vegetable Gardens
Dripline can be installed along vegetable garden rows to deliver water close to the root zones of crops. Dripper spacing should be selected based on the crop, soil type and planting arrangement. Parallel runs are commonly used where plants are arranged in rows.
Agriculture and Vineyards
Dripline is widely used in agriculture because it can deliver water directly to crop root zones.
Long runs can be installed along crop rows, while vineyards and orchards can use dripline to provide controlled irrigation to individual plants.
Agricultural installations can involve significant lengths of tubing, making accurate material quantities important when preparing an irrigation takeoff or project estimate.
Slopes and Hillsides
Dripline can also be used on sloped landscapes. However, elevation changes can affect water pressure and distribution.
A pressure compensating dripline can help maintain a more consistent emitter flow across changes in elevation. This makes it useful for hillsides and other challenging landscape areas where maintaining uniform irrigation is difficult.
How Do You Estimate Dripline Quantities?
Estimating dripline quantities starts with the irrigation plans and planting layout.
An estimator typically identifies the areas receiving drip irrigation, measures the proposed tubing routes, and determines the required linear footage. The estimator may then quantify additional components such as fittings, valves, filters, regulators, and connections.
For a landscape contractor, this can become time-consuming when a project includes multiple planting zones, curved beds, trees, shrubs, and detailed irrigation layouts.
A digital or AI-based takeoff workflow can reduce the amount of manual tracing required. Instead of measuring every irrigation line manually, contractors can use automated takeoff tools to identify relevant plan elements and generate quantities for review.
Beam AI's landscaping takeoff workflow can extract quantities for landscaping scopes including planting areas and irrigation, from project plans, delivering 99%+ accurate, QA-checked outputs in 24-72 hours. This helps landscaping contractors 3X their bidding capacity without adding more estimating workload.
How Much Dripline Do You Need Per Plant?
There is no fixed amount of dripline required per plant. The amount depends on plant size, root-zone coverage, emitter spacing, flow rate, soil type and the irrigation layout.
For individual trees, installers may use a loop around the root zone rather than placing a short section of tubing next to the trunk. For shrubs and densely planted beds, parallel dripline runs can provide broader coverage.
The quantity should therefore be calculated from the planned layout and required emitter coverage rather than using a fixed length per plant.
How Do You Troubleshoot Clogging in Dripline?
Clogging can reduce or stop water flow through individual emitters. Common causes include sediment, debris, algae and inadequate filtration.
If an emitter is not delivering water, check the filter first, inspect the affected section of tubing and flush the line where appropriate. Persistent clogging may indicate that the filtration system, water quality or maintenance schedule needs to be addressed.
Why Accurate Dripline Takeoffs Matter
Small quantity errors can add up quickly on large landscape projects. Underestimating dripline can lead to material shortages, additional orders and installation delays whereas overestimating can inflate the bid and make a contractor less competitive.
Accurate irrigation takeoffs help contractors understand the complete scope before pricing the work. When the estimator has a clearer picture of tubing, fittings, valves, and other irrigation components, it becomes easier to build a realistic material and labor estimate.
For larger landscaping projects, this becomes even more important because irrigation is only one part of the overall scope. Estimators may also need to quantify trees, shrubs, planting areas, mulch, hardscape, grading, and other landscape elements.
Final Thoughts
Dripline provides controlled irrigation by delivering water through built-in emitters directly around plant root zones. It is commonly used in landscape beds, gardens, trees, shrubs, agriculture, vineyards and sloped planting areas.
Understanding dripper spacing, dripline flow rate, pressure requirements, and installation methods helps contractors select the right system and build more accurate irrigation estimates.
For landscape contractors, accurate quantity takeoffs are just as important as understanding the irrigation system itself. AI-based takeoff & estimating software can help streamline this process by extracting irrigation quantities from project plans, giving estimators a faster starting point for reviewing scope, pricing materials, and preparing bids.


.jpg)