




What is a Roofing Estimate?
A roofing estimate is a detailed calculation of the materials, labor, equipment, disposal, overhead, and other costs required to complete a roofing project. It starts with roof measurements and a roofing takeoff, then accounts for factors such as pitch, material quantities, waste, labor requirements, and project conditions.
A complete roofing estimate gives the contractor a clearer picture of what the job requires and what it is likely to cost before a final price goes into the bid.
How to Prepare a Roofing Estimate in 5 Steps
A roofing estimate can go wrong long before the final price is entered.
Miss a valley during measurement, use the wrong pitch factor, or carry over a waste percentage from a completely different roof, and that mistake can show up later in material quantities, labor, and pricing.
That is why professional roofing estimates are usually built in stages. The estimator first establishes the scope, measures the roof, completes the takeoff, converts those measurements into material quantities, and then prices the work.
Here are the main roofing estimate steps.
Step 1: Define the Roofing Scope and Check Roof Conditions
Before measuring anything, establish exactly what the estimate needs to cover.
For a plan-based project, that usually means reviewing roof plans, elevations, specifications, schedules, details, and relevant addenda. On replacement or renovation work, the estimator may also rely on site measurements, photos, aerial imagery, or an existing measurement report.
This review is where you identify details that could change the estimate, including:
- roofing system
- tear-off requirements
- number of roof levels
- roof pitch
- insulation
- flashing
- drainage
- penetrations
- access conditions
- existing roof conditions
The goal is to understand what you are pricing before you begin measuring it.
That matters because an accurate roof measurement can still lead to an incomplete estimate if part of the scope was missed at the start.
Step 2: Measure the Roof for Your Roofing Takeoff
Once the scope is clear, the estimator can begin the roof measurement and takeoff.
A roofing takeoff turns the drawings or field measurements into quantities that can eventually be priced.
Total roof area is only one part of the takeoff. Depending on the roofing system, the estimator may also need to measure:
- eaves
- rakes
- ridges
- hips
- valleys
- parapets
- flashing
- roof edges
Skylights, drains, vents, chimneys, scuppers, curbs, and other penetrations may need to be counted separately.
These quantities can come from printed plans, digital drawings, field measurements, aerial data, or roofing takeoff software.
How to Calculate Roofing Squares
Roofers often convert the measured surface area into roofing squares before working out material quantities. Every 100 square feet of roof area counts as one square.
So, a roof measuring 2,400 square feet would come to 24 roofing squares. The conversion is simply the total roof area divided by 100.
The important part is making sure you are working with the actual roof surface area, not automatically treating the building footprint as the roof measurement.
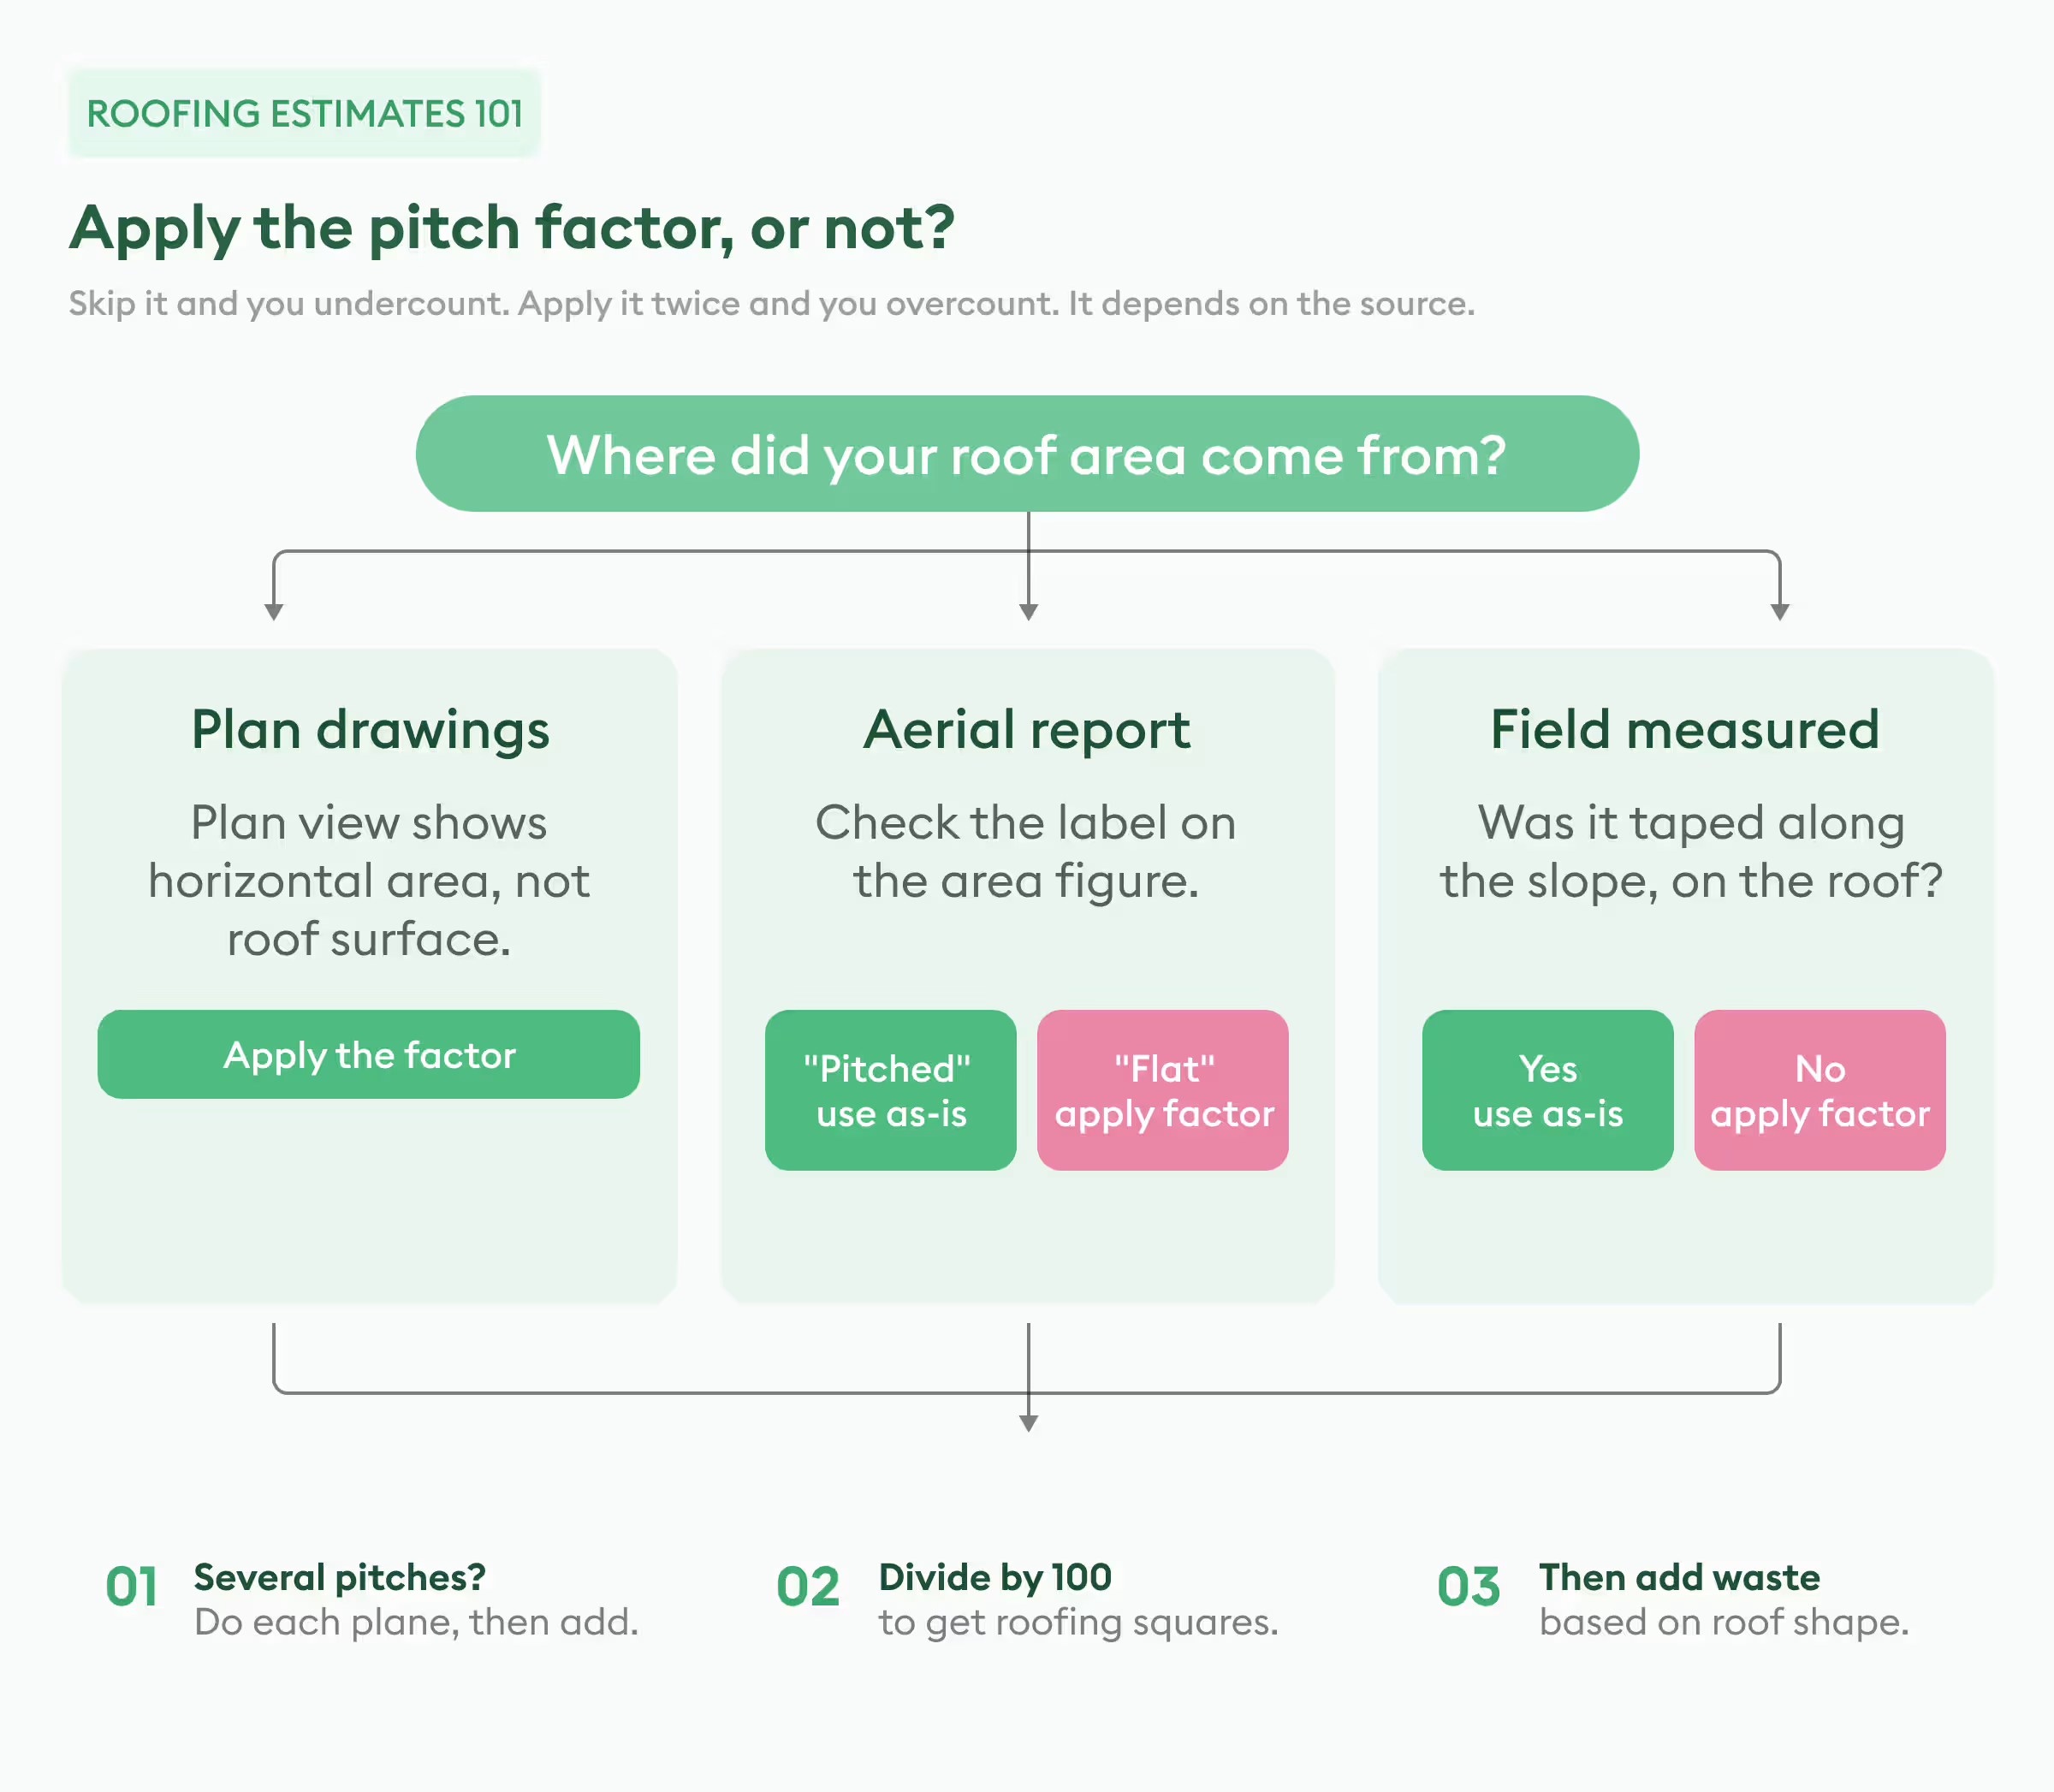
How to Calculate Roof Area With a Pitch Factor
That distinction becomes especially important on pitched roofs.
When the starting measurement is the horizontal footprint or plan area, the estimator needs to account for the slope to understand how much roof surface is actually there.
A roof pitch factor can be used for this calculation.
Take a roof with a 1,600-square-foot horizontal area and a 6/12 pitch. Multiplying the footprint by a 1.118 pitch factor gives an estimated sloped surface of:
1,600 × 1.118 = 1,788.8 sq. ft.
That works out to roughly 17.9 roofing squares.
For roofs with several sections or different pitches, each roof plane may need to be calculated separately before the areas are added together.
It is also worth checking what the measurement source already provides. If an aerial report or digital measurement already accounts for the slope, applying another pitch factor would inflate the quantity.
Step 3: Build a Roofing Material List
The takeoff tells you what is on the roof and how much of it there is. The next step is translating those measurements into a roofing material list.
For an asphalt shingle roof, that list could include:
- shingles
- underlayment
- starter strips
- ridge and hip caps
- ice-and-water protection
- drip edge
- flashing
- fasteners
- vents
- other accessories
A commercial membrane system would have a different set of materials.
The units also change from one item to another.
The takeoff should preserve those differences instead of reducing every quantity to roofing squares.
For a closer look at how measurements from drawings become usable material quantities, see Beam AI’s material takeoff guide.
What Waste Factor Should You Use for Roofing?
The measured quantity is not always the same as the amount that eventually needs to be ordered.
Roofing materials may need to be cut around valleys, hips, dormers, penetrations, and edges. Installation patterns, laps, product dimensions, and breakage can all affect how much material ends up being used.
That extra quantity is accounted for through the roofing waste factor.
Say a takeoff comes to 18 squares and the estimator decides the roof calls for a 10% waste allowance. The adjusted quantity would be:
18 × 1.10 = 19.8 squares
The percentage itself should not simply be copied from the previous project.
A straightforward gable roof will usually involve fewer cuts than a roof broken up by several hips, valleys, and dormers. Material type and installation method matter too.
Waste should therefore reflect the roof being estimated rather than act as a cushion for measurements the estimator is unsure about.
Beam AI’s guide to waste factors looks more closely at why those percentages can vary by material, project, and trade.
Step 4: Price Roofing Materials, Labor, and Job Costs
Once the quantities are ready, the estimate moves into pricing.
Start by matching the material quantities with current costs. Depending on how the contractor works, those numbers might come from supplier quotes, price lists, purchasing records, or an internal cost database.
Material prices deserve a fresh check for each bid. In Roofing Contractor’s 2026 State of the Roofing Industry Report, 38% of respondents identified higher building material costs as a major business challenge.
Then comes the roofing labor cost. Labor may be estimated using:
- crew hours
- production rates
- labor cost per square
- historical job data
- a combination of these methods
Whatever method is used, it needs to reflect the roof in front of the estimator.
Twenty squares on a simple, easily accessible roof will not necessarily require the same labor as twenty squares spread across steep slopes, several levels, valleys, and penetrations.
Pitch plays a role here too. Beyond increasing surface area, a steeper roof may affect crew movement, staging, safety requirements, and installation speed.
Crew availability can affect the schedule behind an estimate. The 2025 AGC/NCCER Workforce Survey found that 45% of responding construction firms had experienced project delays because they or their subcontractors lacked workers.
Other project costs may include:
- tear-off
- decking repair
- dumpsters and disposal
- equipment rentals
- lifts
- permits
- delivery
- site protection
- subcontracted work
At this stage, the estimate moves beyond quantities and starts showing what it will actually take to complete the project.
For a broader look at how contractors put those costs together, see Beam AI’s guide to construction cost estimation.
How to Add Overhead and Profit to a Roofing Estimate
Direct project costs still do not represent the final selling price.
A roofing contractor also has expenses that are not tied neatly to one roof. Insurance, vehicles, office payroll, software, facilities, and administrative costs all have to be covered by the work the company performs.
Those costs are typically accounted for through overhead.
Profit or the company’s target margin is then added according to its pricing approach.
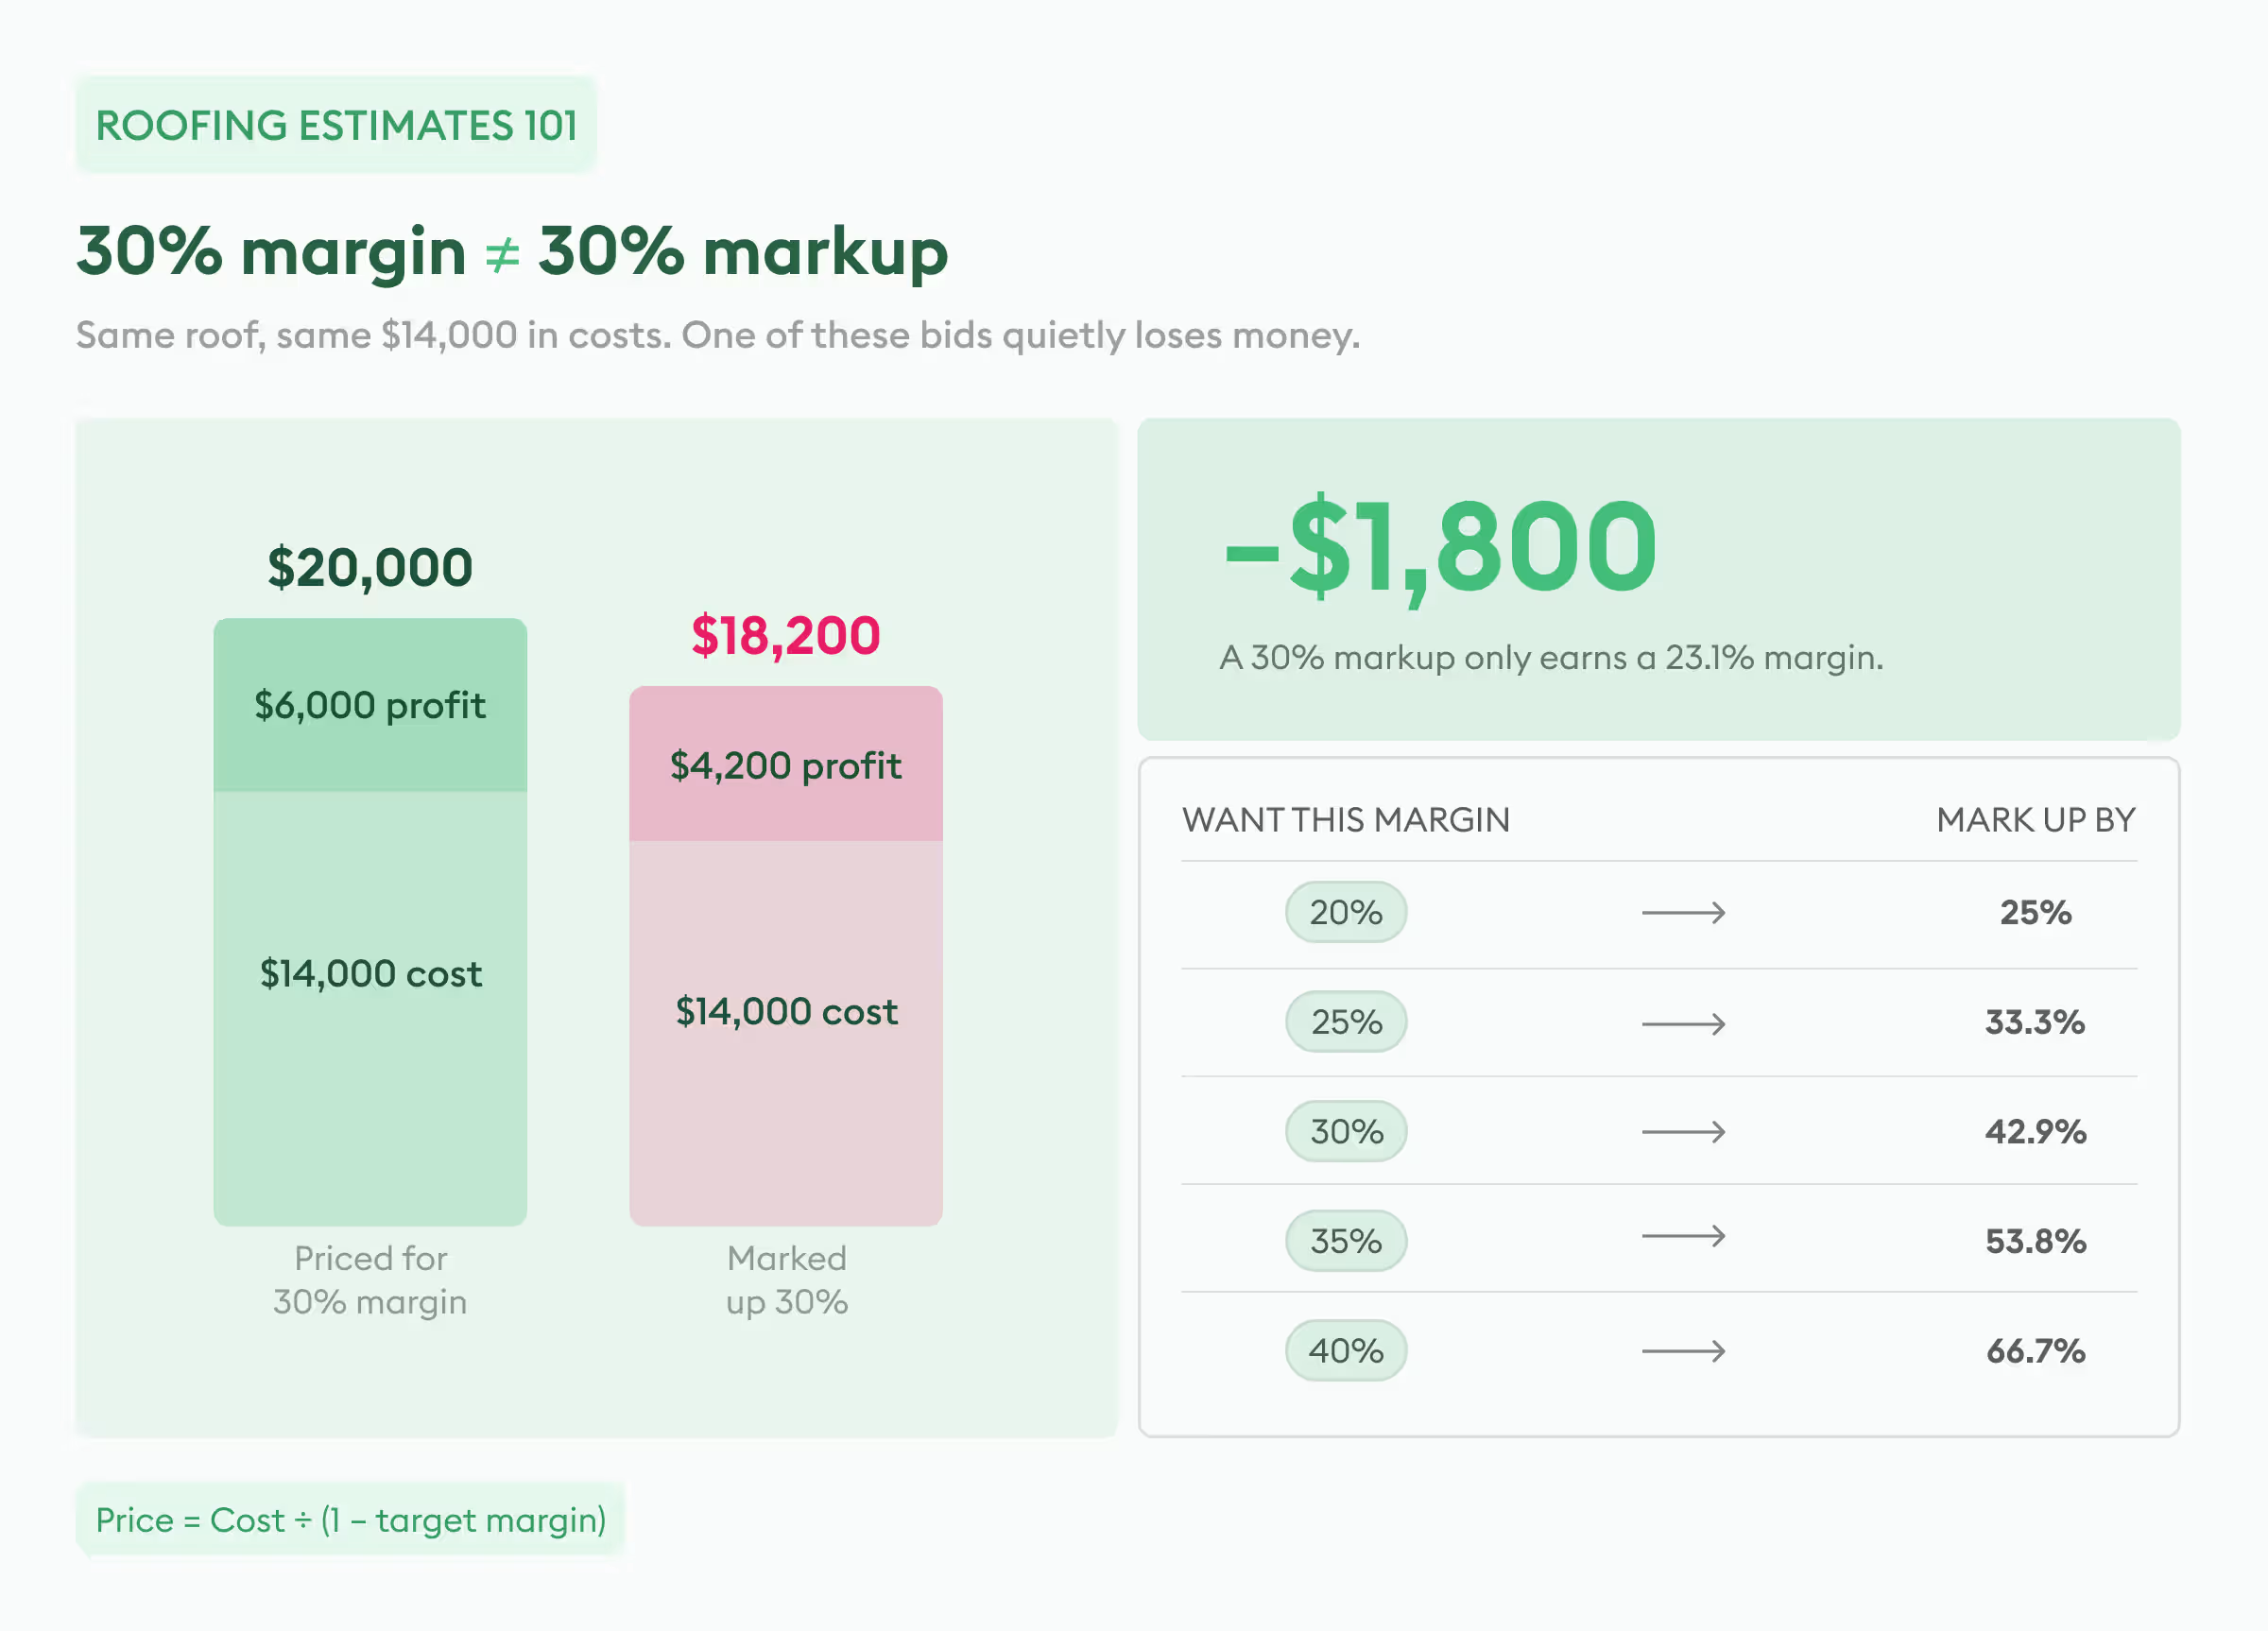
For example, when pricing around a target gross margin, one commonly used calculation is:
Selling price = total cost ÷ (1 − target margin)
With $14,000 in total costs and a 30% target gross margin:
$14,000 ÷ 0.70 = $20,000
That is different from increasing $14,000 by a 30% markup.
Before the number is finalized, the estimator should also revisit supplier prices, labor assumptions, exclusions, allowances, and any drawing revisions or addenda that may have arrived during estimating.
Step 5: Review and Write the Final Roofing Estimate
With the quantities and pricing complete, the pieces can be brought together into the written estimate.
The document should make it easy to understand what the contractor has included in the price.
Depending on the project, that may cover:
- project scope
- roof measurements
- roofing squares
- specified roofing system
- material quantities
- tear-off requirements
- disposal
- insulation
- flashing
- accessories
- roofing labor cost
- equipment or permits
- allowances
- exclusions
- warranty information
- payment terms
- estimate validity
- final project price
The final check can also be done in reverse.
Can the price be traced back to its material and labor costs? Do those costs connect to measurable quantities? And do the quantities match the plans, roof conditions, and scope?
That trail becomes particularly useful when an addendum arrives or somebody wants to know why a quantity or price changed.
How can roofing estimating software speed up takeoffs?
Moving from manual estimating to software does not change the fundamentals of building an estimate.
It changes how the estimator gets to the quantities.
Traditional takeoff software allows measurements to be completed on digital drawings rather than paper plans. Roofing takeoff software gives estimators tools for capturing roofing-specific areas, lengths, and counts.
AI takeoff software can automate more of this measurement work by identifying relevant scope and extracting quantities from drawings.
With an AI takeoff, the estimator can spend less time tracing roof areas or repeatedly counting components and more time checking quantities, reviewing the scope, pricing the job, and deciding how to bid it.
Beam AI’s roofing estimating software, for example, can be used to extract roofing quantities such as roof areas, insulation, flashing lengths, and accessory quantities from project plans.
But completing the takeoff does not finish the estimate.
Material prices move. Crew productivity changes from project to project. Access, scope gaps, risk, overhead, and margin still need to be considered before the final price is ready.
That is where the estimator’s judgment remains part of the process, even when the measurement work is handled with estimating software.
For more on the role of AI in this part of the workflow, see Beam AI’s guide to AI roofing takeoff software.
Bottom Line: Build Every Roofing Estimate From the Roof Up
A roofing estimate should not begin with whatever the last project happened to cost per square. It should begin with the roof being estimated.
Define the scope. Measure it. Account for pitch. Build the material quantities. Add waste based on the roof’s geometry. Price the labor and other project costs. Then account for overhead and profit.
Whether an estimator handles those steps manually or uses roofing estimating software, the final number should still connect back to the measurements and assumptions behind it.
That makes the estimate easier to review when plans change, easier to explain when questions come up, and harder for a missed quantity to disappear inside the final price.


.jpg)