


.jpg)


Why parking lot striping starts with layout and not paint
Parking lot striping looks straightforward once the paint is down. But getting those lines in the right place takes more than measuring a few spaces and snapping chalk lines.
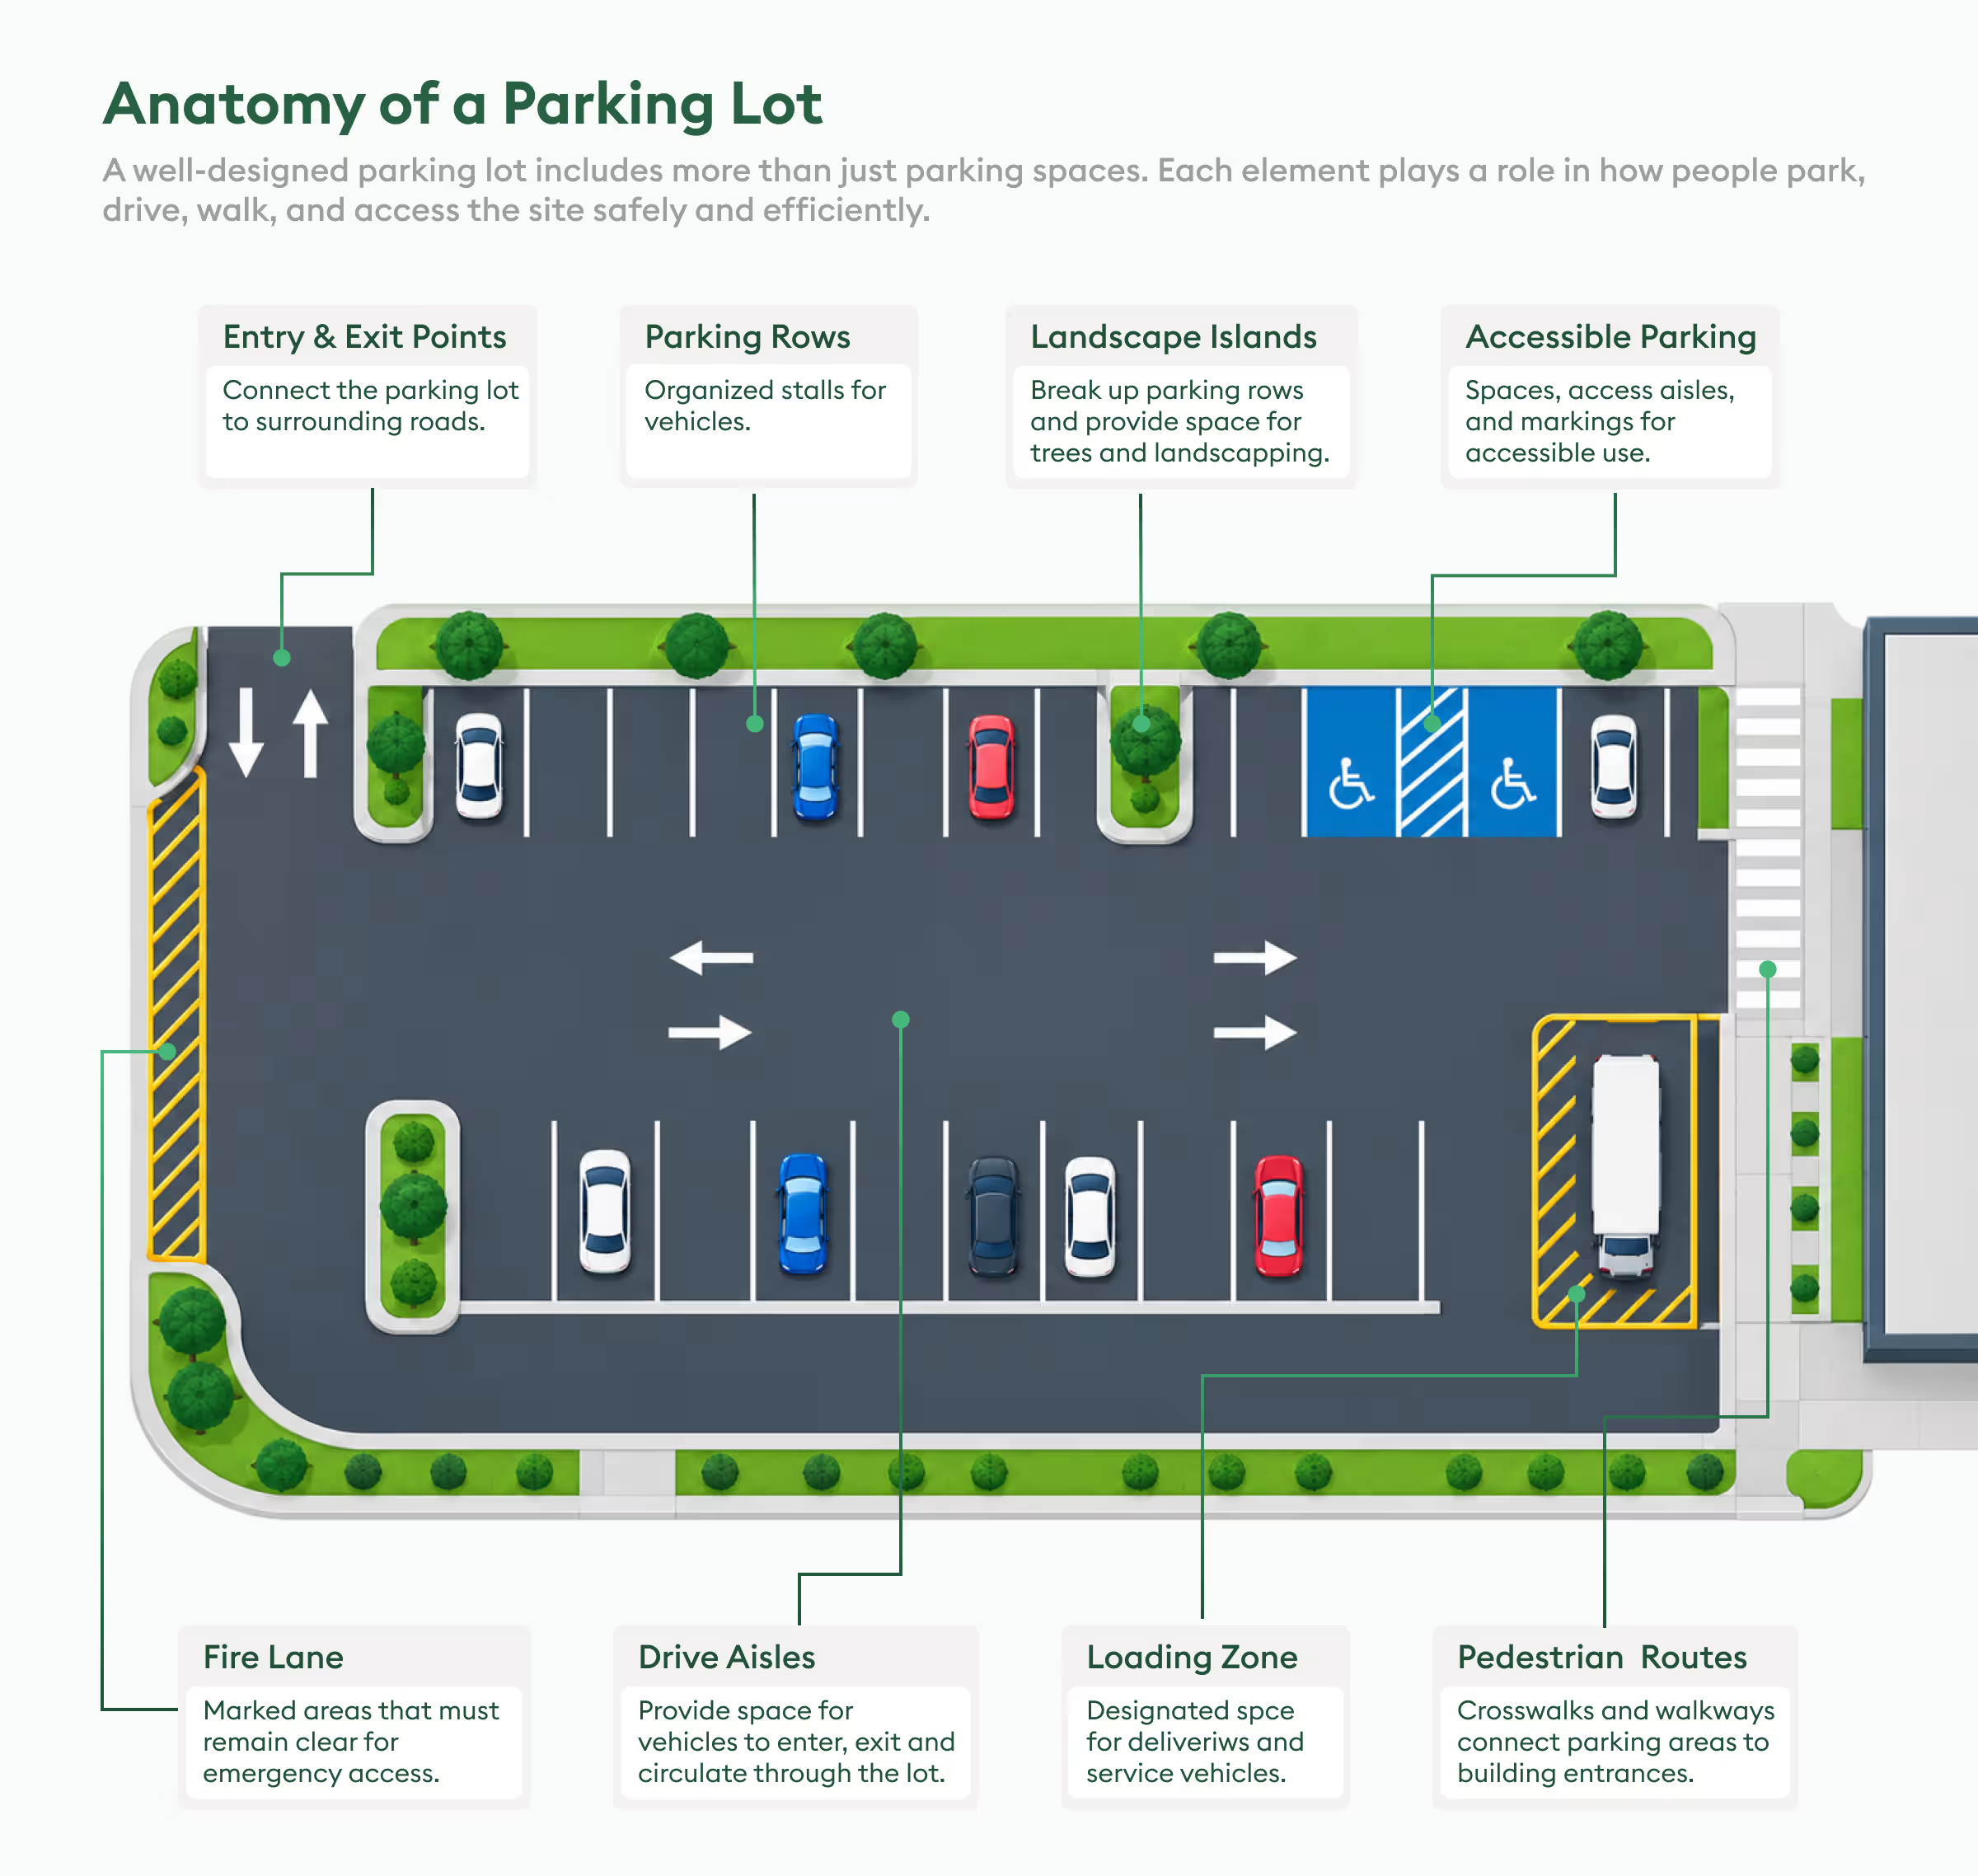
The layout has to account for parking stall dimensions, parking angle, drive aisle width, circulation, accessible spaces, pedestrian routes, and the shape of the site. Even small changes to one of these can affect how many spaces fit and how vehicles move through the lot.
The Institute of Transportation Engineers (ITE) maintains the Parking Generation Manual, 6th Edition, which draws on more than 10,000 peak-period parking demand counts across more than 100 land uses. While parking demand data is different from striping geometry, it highlights an important point: parking layouts need to be considered in the context of how a site is actually used, not just how much pavement is available.
What determines a parking lot striping layout?
Before putting down a single line, establish the parking lot dimensions and circulation pattern that will control the rest of the layout.
Parking stall size
There is no single standard parking stall size that applies to every U.S. parking lot. Local zoning and site-development requirements determine the required dimensions.
That said, 9 ft wide × 18 ft deep is a commonly used starting point for a standard passenger-vehicle space. Other layouts may use narrower or wider stalls depending on the property type and local requirements.
For example, a retail property with frequent vehicle turnover may have different requirements from an employee parking area. Always check the approved site plan and local code before treating a commonly cited dimension as the project standard.
For accessible spaces, the dimensions are governed separately by the ADA. The 2010 ADA Standards require a minimum width of 96 inches for an accessible car space and 132 inches for a van space, with an exception allowing an 8-ft van space when paired with an 8-ft access aisle.
Parking angle
The angle of the parking spaces affects both the amount of space each row requires and how vehicles enter and leave the stalls.
The most common configurations include:
- 90-degree parking: Stalls sit perpendicular to the aisle and are commonly used with two-way circulation.
- 60-degree parking: Angled stalls generally work with one-way circulation.
- 45-degree parking: A shallower angle can make entry and exit easier and is typically paired with one-way circulation.
- Parallel parking: Spaces run along the direction of travel and are usually used along site edges or streets.
A Federal Lands Highway pavement-marking detail illustrates how the stall dimensions change with angle: for 9-ft stalls, the minimum stall length shown decreases as the parking angle moves from 45° to 90°.
The important thing is not to choose the angle in isolation. Parking angle, stall dimensions, and drive aisle width need to be designed as one system.
Drive aisle width
The drive aisle is the space vehicles use to enter, leave, and circulate between parking rows.
A 24-ft aisle for two-way traffic is a common planning dimension for perpendicular parking. One-way angled layouts can use narrower aisles, often around 12–15 ft depending on the configuration and governing requirements. These figures are useful for preliminary planning, but the approved project design and local code should always take precedence.
Striping line width
Parking stall lines are commonly 4 inches wide, although the exact requirement can vary by jurisdiction and project specification.
For example, Chicago's municipal code specifies a minimum 4-inch stripe for parking spaces and allows stall widths to be measured from the center of the stripe.
One important distinction: the current MUTCD's parking-space marking provision addresses on-street parking space markings. It should not automatically be treated as the source of every off-street parking lot striping requirement.
So when determining parking lot striping dimensions, use the project's approved drawings, specifications, and local regulations as the final reference.
How to layout a parking lot for striping
Once the basic dimensions are established, the actual layout can be built in a logical sequence.
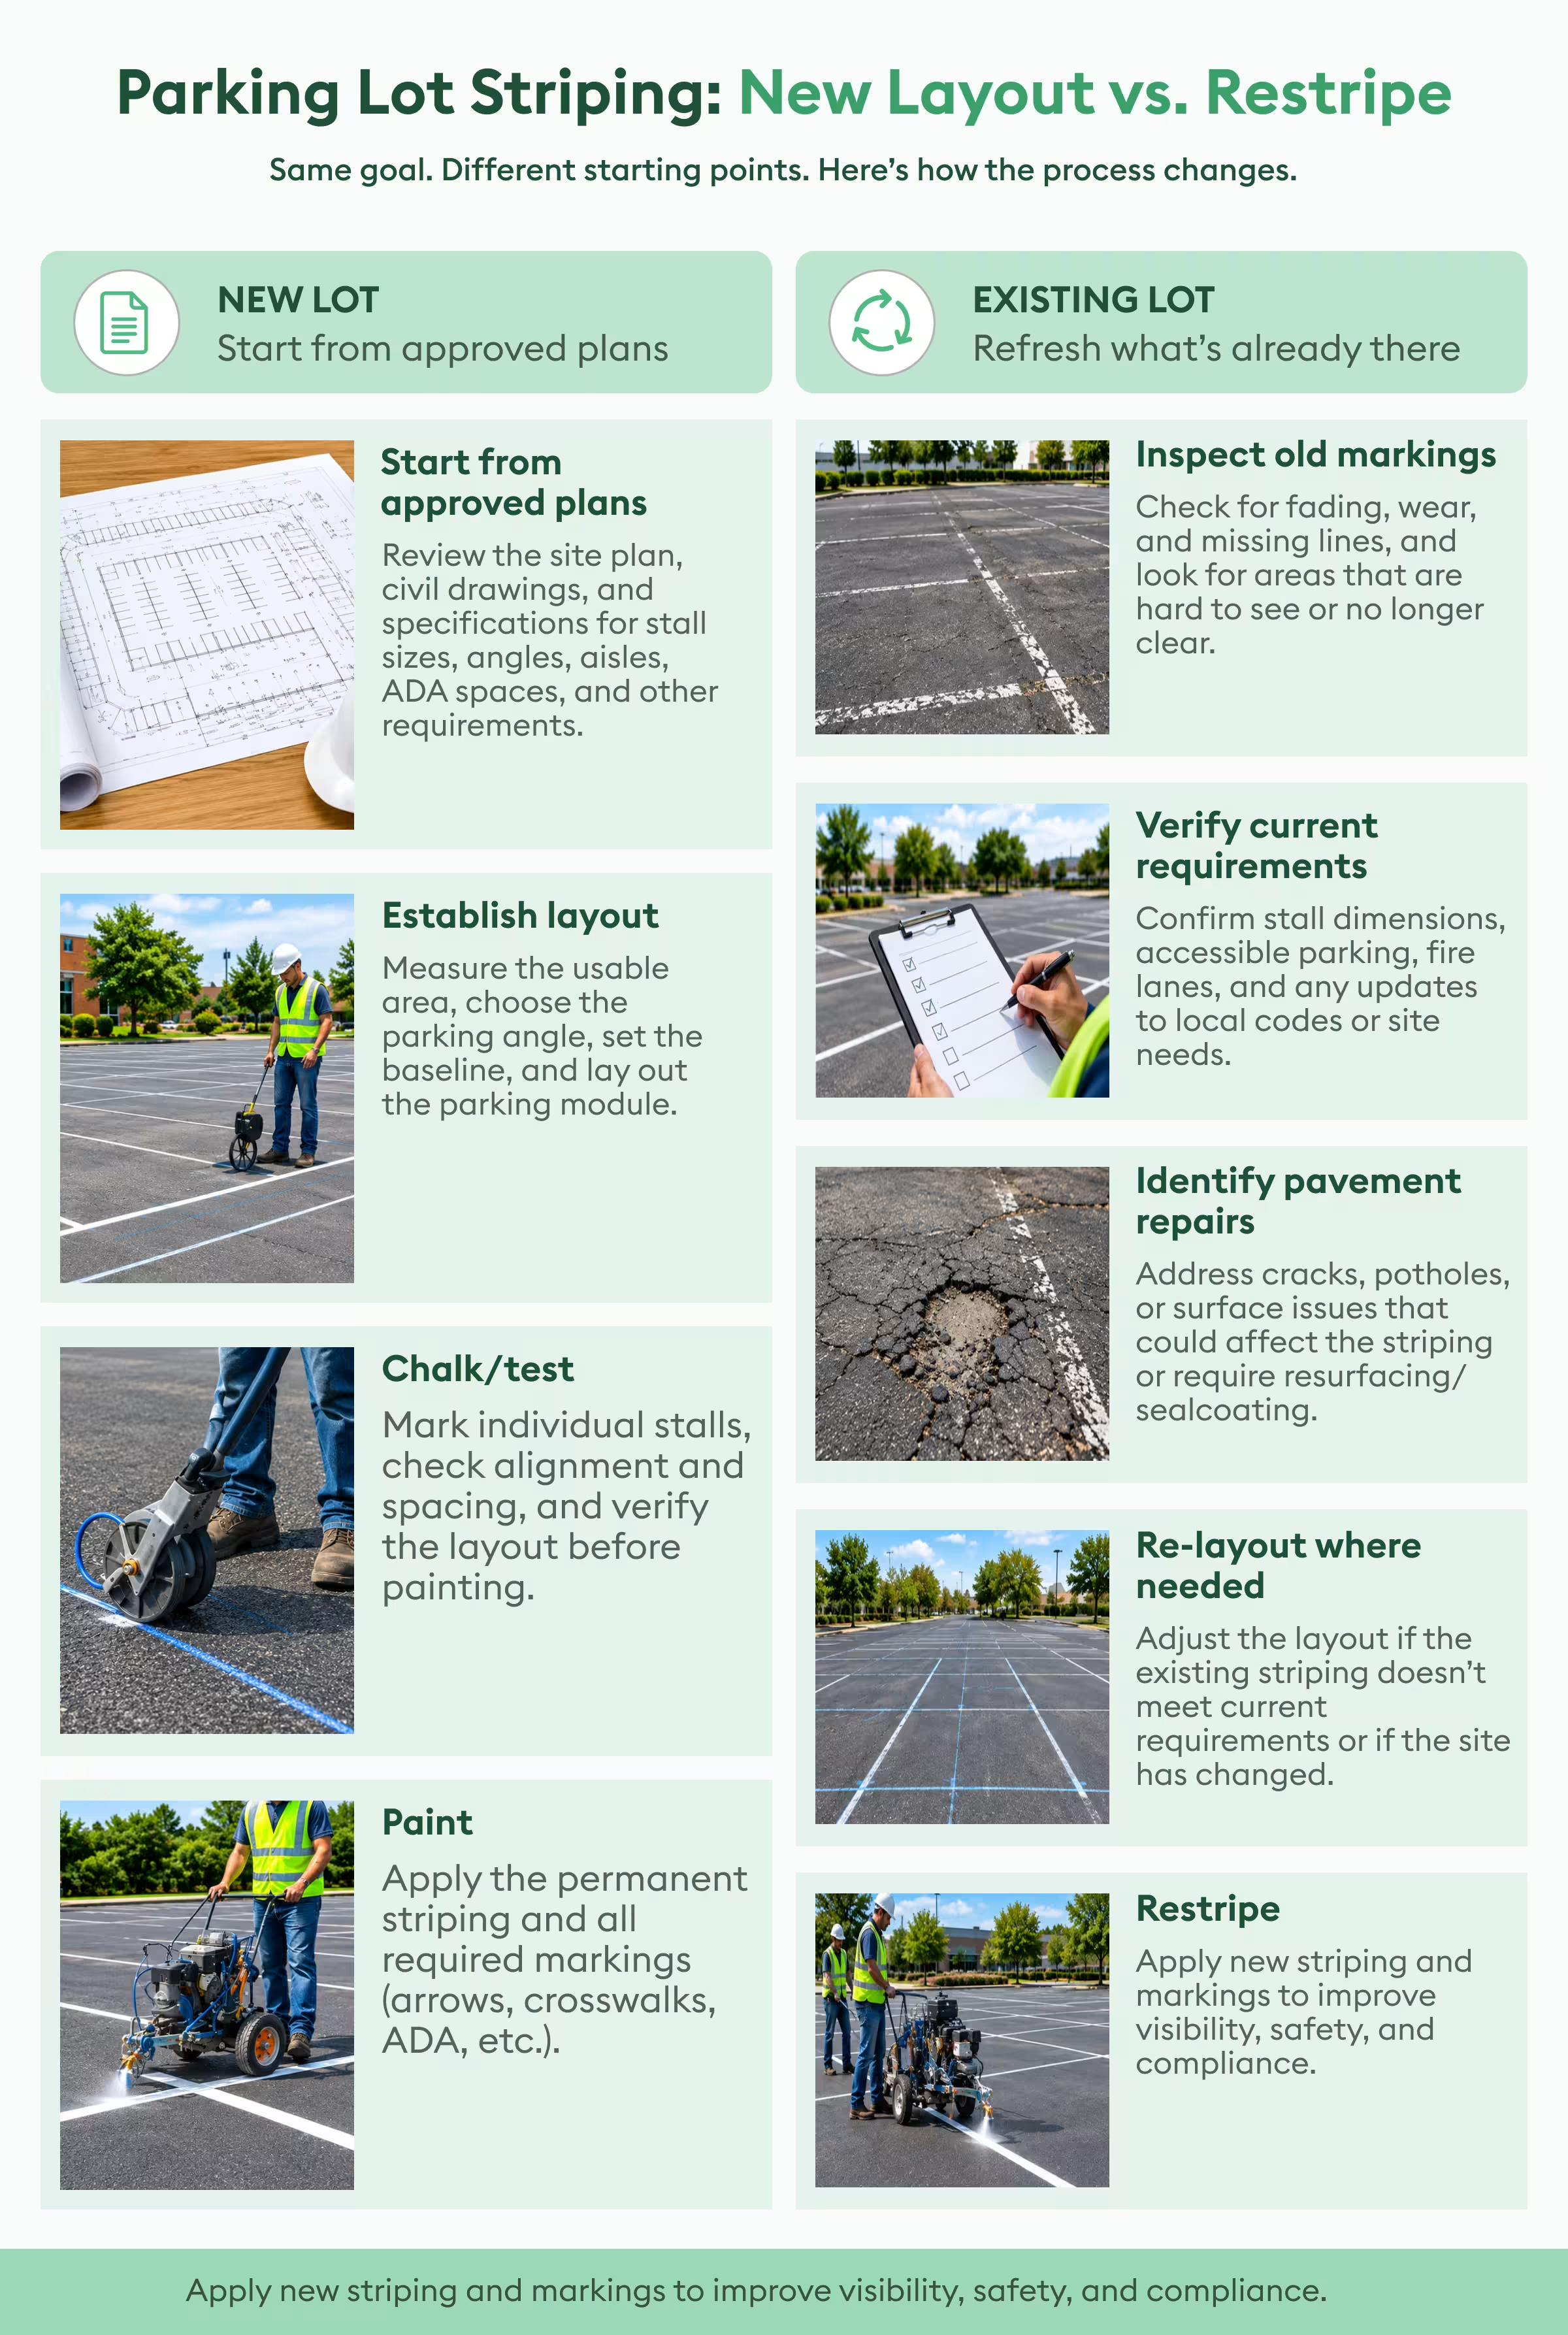
Step 1: Review the site plan and local requirements
Start with the approved drawings, and check the site plan, civil drawings, parking requirements, notes, and specifications for:
- Required parking count
- Stall dimensions
- Parking angle
- Drive aisle widths
- Accessible parking
- Fire lanes
- Loading zones
- Pedestrian routes
- Entrances and exits
- Landscaping or parking islands
- Wheel stops and other site features
This step is especially important on new construction or redesigned lots. The paint crew should not have to determine the intended layout by looking at an empty slab of asphalt.
Step 2: Measure the usable parking area
Next, determine how much of the site is actually available for parking.
The total pavement area is not necessarily the usable parking area. Buildings, curbs, sidewalks, drainage structures, landscape islands, light poles, loading areas, entrances, and fire access can all reduce the space available for stalls.
Measure the usable length and depth of the parking area, then compare those dimensions with the proposed parking module. This is where a seemingly large lot can turn out to have less parking capacity than expected.
Step 3: Choose the parking angle and traffic flow
Now establish how vehicles will move through the lot.
For a 90-degree layout, determine where two-way aisles will run. For angled parking, establish the direction of one-way traffic and make sure the aisle provides enough room for the intended vehicle movement.
Do not start dividing the pavement into individual spaces until this relationship is settled.
A useful way to think about it is: Stall dimensions + aisle width + circulation = parking module
Once that module works, it can be repeated across the site.
Step 4: Establish a baseline
Before snapping individual parking lines, create a reliable reference line. This could be a curb, a building edge, a property line, a surveyed point, or another verified straight reference.
The baseline gives the rest of the layout something consistent to work from.
If an existing lot is being restriped, avoid assuming that the old lines are correct. They may have shifted, been laid out incorrectly, or no longer match the property's current requirements.
Step 5: Measure one full row set (stall + aisle + stall)
This is where the dimensions start coming together.
For a simple 90-degree layout, you might have a typical arrangement such as: 18-ft stall + 24-ft aisle + 18-ft stall = approximately 60 ft
That repeating 60-ft section becomes the basic double-loaded parking module.
The exact dimensions will depend on the approved design, but the principle stays the same: establish the full module before dividing it into individual spaces. This prevents a common problem: laying out beautiful, evenly spaced stalls only to discover that the final row does not fit the available space.
Step 6: Snap the individual stall lines
Once the module is established, divide each row into individual spaces.
For a straight 90-degree row, measure the required stall width at consistent intervals. For angled parking, use the approved angle to establish the direction of each line.
Chalk is useful at this stage because it makes corrections inexpensive. Once the spacing, alignment, and angle have been checked, the layout can be converted into permanent striping.
The goal is not simply to make every stall look identical. The lines also need to remain aligned with curbs, islands, drive aisles, entrances, and the overall circulation pattern.
Step 7: Add accessible and other required markings
After the primary parking rows are laid out, add the spaces and markings that have their own requirements. These can include:
- Accessible parking spaces
- Access aisles
- Directional arrows
- Crosswalks
- Stop bars
- Fire lanes
- Loading zones
- No-parking areas
- Curb markings
- Parking symbols
- Wheel stops
These elements should be coordinated with the parking layout rather than added wherever there happens to be leftover pavement.
Step 8: Inspect the complete layout before painting
Before applying paint, walk the entire layout. Check that:
- Stall widths are consistent
- Aisles provide the required circulation
- Parking rows align correctly
- Accessible spaces and aisles are correctly positioned
- Pedestrian routes remain usable
- Fire lanes and restricted areas are clear
- Entrances and exits work with the circulation pattern
- No poles, islands, drains, or other obstacles conflict with the layout
It is much easier to move a chalk line than to remove a freshly painted stripe.
ADA parking lot striping requirements
Accessible parking needs to be considered during the initial layout, not added after the standard stalls are finished.
Under the 2010 ADA Standards, the number of accessible spaces depends on the total number of spaces in each parking facility. For example, a facility with 1-25 spaces requires at least one accessible space; 26-50 requires two; 76-100 requires four, and the requirements continue to increase with parking capacity.
Accessible spaces also need an access aisle at least 60 inches wide, extending the full length of the space. Two accessible spaces are permitted to share one access aisle.
For van-accessible spaces, the ADA provides two configurations: an 11-ft-wide space with a 5-ft access aisle, or a 96-inch-wide space with a 96-inch-wide aisle. At least one of every six accessible spaces must be van accessible.
The accessible route matters just as much as the paint. The parking space and access aisle need to connect to an accessible route, and the surface must comply with the applicable slope requirements.
So an accessible parking space is not simply a standard stall with a wheelchair symbol added afterward. Its dimensions, access aisle, location, route, and signage all need to be considered as well.
Other pavement markings to include in a parking lot striping layout
A finished parking lot usually contains rows of stall lines, along with the following, depending on the project:
- Directional arrows to tell drivers which way to travel.
- Stop bars at intersections, entrances, exits, or other controlled points.
- Crosswalks where pedestrian routes cross vehicle paths.
- Fire-lane markings where vehicles need to stay clear for emergency access.
- Loading and no-parking zones where parking would interfere with deliveries, circulation, or access.
- Accessible symbols and access aisles to identify spaces reserved for accessible parking.
- Curb markings where local requirements use color to identify restricted areas.
The MUTCD explains that pavement markings can supplement signs and other traffic control devices, while also conveying regulations, warnings, or guidance. That means striping divides the pavement, but it also helps communicate how the site is supposed to function.
How often to restripe a parking lot
There is no single restriping schedule that works for every parking lot.
As a general planning range, many commercial lots need restriping about every 1 to 3 years, with some needing attention sooner depending on traffic, weather, sun exposure, snowplowing, pavement condition, and marking material.
Traffic volume is one of the biggest factors. A busy retail or shopping-center lot can wear much faster than a lightly used office parking lot. Climate matters, too. Strong sun, frequent rain, snowplowing, deicing chemicals, and temperature changes can all shorten the life of pavement markings.
The type of marking material also affects how long the striping lasts. Standard traffic paint generally requires more frequent refreshing than higher-durability materials used in high-wear areas.
If the lot has recently been sealcoated or resurfaced, restriping will also generally be needed once the surface is ready.
Hence, a better approach than relying on the calendar alone is to inspect the lot regularly and restripe when the markings are no longer clear.
Visual triggers that signal restriping is overdue
You do not need to measure paint thickness to know when a parking lot needs attention. In many cases, the markings themselves provide the warning signs.
1. Faded or low-contrast stall lines - Fresh striping should stand out clearly against the pavement. When white stall lines start looking gray, patchy, or difficult to distinguish from the asphalt, visibility is already declining. Pay particular attention to the lot at different times of day. A line that looks acceptable in bright sunlight may be much harder to see in low light or wet conditions.
2. Broken or blurry marking edges - Parking lines should have reasonably clear edges. When the edges become feathered, worn, or broken into sections, the layout becomes harder for drivers to follow. The same applies to directional arrows, stop bars, crosswalks, and other pavement markings where if you can no longer immediately recognize their shapes, they are candidates for restriping.
3. Faded ADA markings - Accessible parking markings deserve particular attention. If the wheelchair symbol, access aisle markings, or other accessible-space markings have become difficult to identify, they should not be left until the next routine maintenance cycle. Federal accessibility requirements cover the design and location of accessible parking spaces, so repainting should be coordinated with a check that the existing layout still meets the applicable requirements.
4. Fire-lane and no-parking markings are hard to read - Safety-related markings should remain easy to recognize. If fire-lane, no-parking, loading-zone, or other restricted-area markings have faded enough that drivers may not notice them, they should move higher on the maintenance list.
5. Drivers are no longer following the layout - Sometimes the clearest sign is how people use the lot. If drivers regularly park across two spaces, block drive aisles, miss directional markings, stop in areas that should remain clear, or even confuse entrances and exits, then the striping may no longer be doing its job.
6. Sealcoating or resurfacing has covered the markings - A fresh pavement surface usually means fresh striping. Sealcoating covers existing pavement markings, so restriping should be scheduled after the new surface has cured.
How to tell when it’s time to restripe
Rather than looking at the striping and wondering about how old it is, you should see if drivers clearly see and understand the parking layout.
If the answer is no, or even maybe, it’s time for you to inspect the lot more closely.
A regular inspection should look at stall lines, accessible spaces, access aisles, directional arrows, crosswalks, stop bars, fire lanes, and other markings. It should also check whether pavement deterioration is affecting the areas that need to be striped.
And if the underlying pavement has significant cracking, potholes, or other failures, restriping should not be treated as a substitute for pavement repair. The surface condition needs to be addressed as part of the maintenance plan.
Top parking lot striping mistakes to avoid
Even a relatively simple lot can run into problems when the layout is rushed:
- Using a common dimension without checking local code. A 9 × 18 ft stall is common, but it is not a universal requirement.
- Choosing the parking stall angle before checking circulation. The angle and aisle width have to work together.
- Trying to squeeze in one extra stall. Reducing stall or aisle dimensions to gain an extra space can create a layout that does not meet the project's requirements, and can also create operational and compliance problems.
- Adding ADA spaces at the end. Accessible spaces and routes need to be part of the initial layout.
- Measuring from old fading striping. Existing markings may not represent the approved layout.
- Ignoring site obstacles. Islands, poles, drains, curbs, fire access, and pedestrian routes can all affect the usable parking space.
- Painting before checking the chalk layout. Once the paint is down, correcting a measurement error becomes much more expensive and time-consuming.
- Treating striping as only parking stalls. Arrows, crosswalks, fire lanes, access aisles, and other markings also affect the scope and quantity takeoff.
Why accurate striping quantities matter when bidding the work
For a striping contractor, the layout also becomes the basis for the estimate.
Instead of treating the job as simply "X parking spaces," the takeoff may need to capture the full scope: stall lines, accessible spaces, access aisles, directional arrows, crosswalks, stop bars, fire-lane markings, curb markings, and other site elements.
That makes the striping layout particularly important during bidding. If the site plan changes, the quantity of markings can change too.
This is where a structured takeoff can help. Beam AI's field-services workflow supports automated measurements for parking stalls, stop bars, crosswalks, directional arrows, asphalt, concrete, and curbs.
For a real example, H&H Striping, a parking lot striping and paving contractor, used Beam AI to reduce measurement time and increase the number of proposals it could send.
If you're looking at the estimating side of the workflow, you can also explore our article on accurate paving takeoffs, which covers how paving contractors can reduce manual measurement work.
Concluding thoughts
A good parking lot striping starts well before the paint machine comes out. The stall size, parking angle, drive aisle, accessible spaces, pedestrian routes, and site constraints all need to be worked out before the first line is applied. Once those decisions are made, the layout can be measured, chalked, checked, and finally painted.
For contractors, there is another reason to get the layout right: it becomes part of the quantity takeoff and ultimately the bid. Knowing exactly what needs to be measured, from parking stalls and striping to curbs and pavement areas, makes it easier to build an estimate around the actual scope rather than a rough parking-space count.